
ICRC-1 Wallet Tutorial: Managing Subaccounts
Mastering Subaccounts and Internal Transactions in Your ICRC-1 Wallet

Our last post covered the basics of managing assets—how to add, remove, and edit asset information. Today, we're diving into subaccounts. By default, each asset has one subaccount which is called the "Default" subaccount. But what if you want to manage multiple subaccounts? Let's explore how to do that.
While you read this you can try it all out live on: https://wallet.ic0.info/
Understanding Subaccounts
Subaccounts provide a convenient way to organize and manage your funds. Imagine you have separate subaccounts for paying services, savings, and trading. This makes it easier to allocate and track your finances. Subaccounts can also be used to segregate incoming funds from different senders. You can give different subaccounts to multiple senders and they will each deposit directly into the subaccount that was given to them.
The ICRC-1 standard allows each user to control arbitrarily many subaccounts for each token. The subaccounts are referenced by a 32 byte identifier which is usually displayed as a hex string. The subaccount with id 0x0 is called the default account.
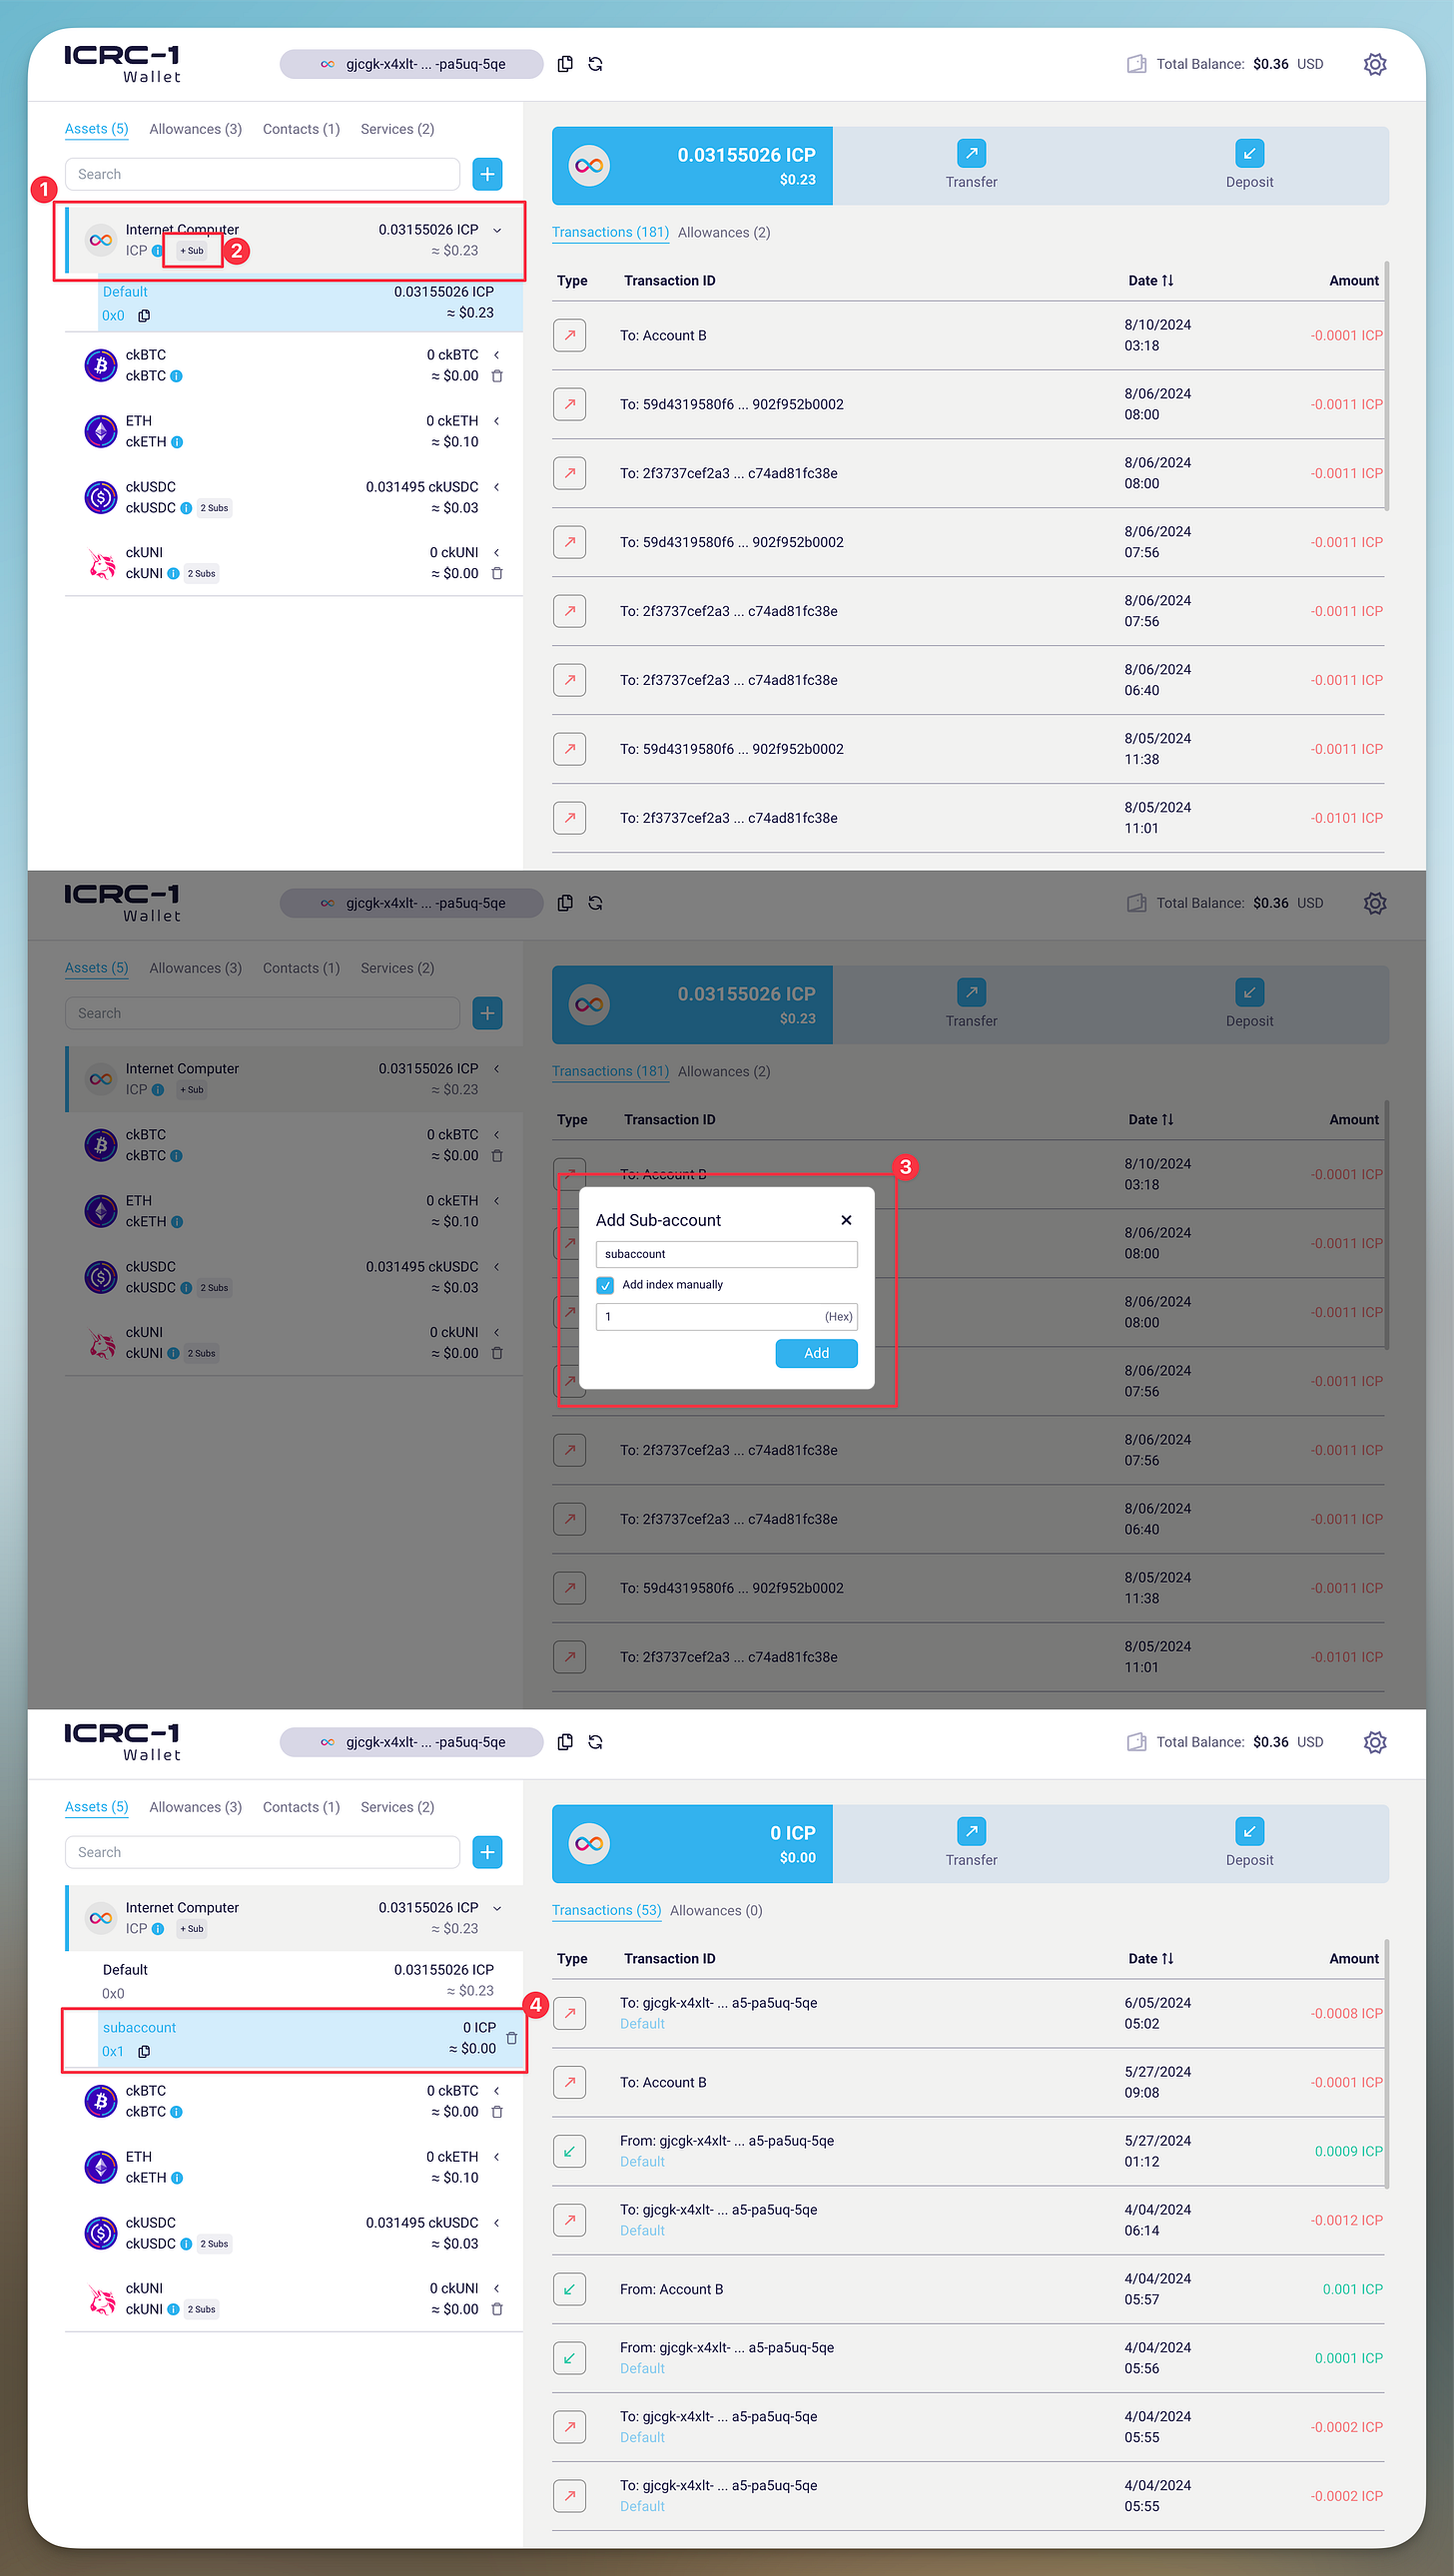
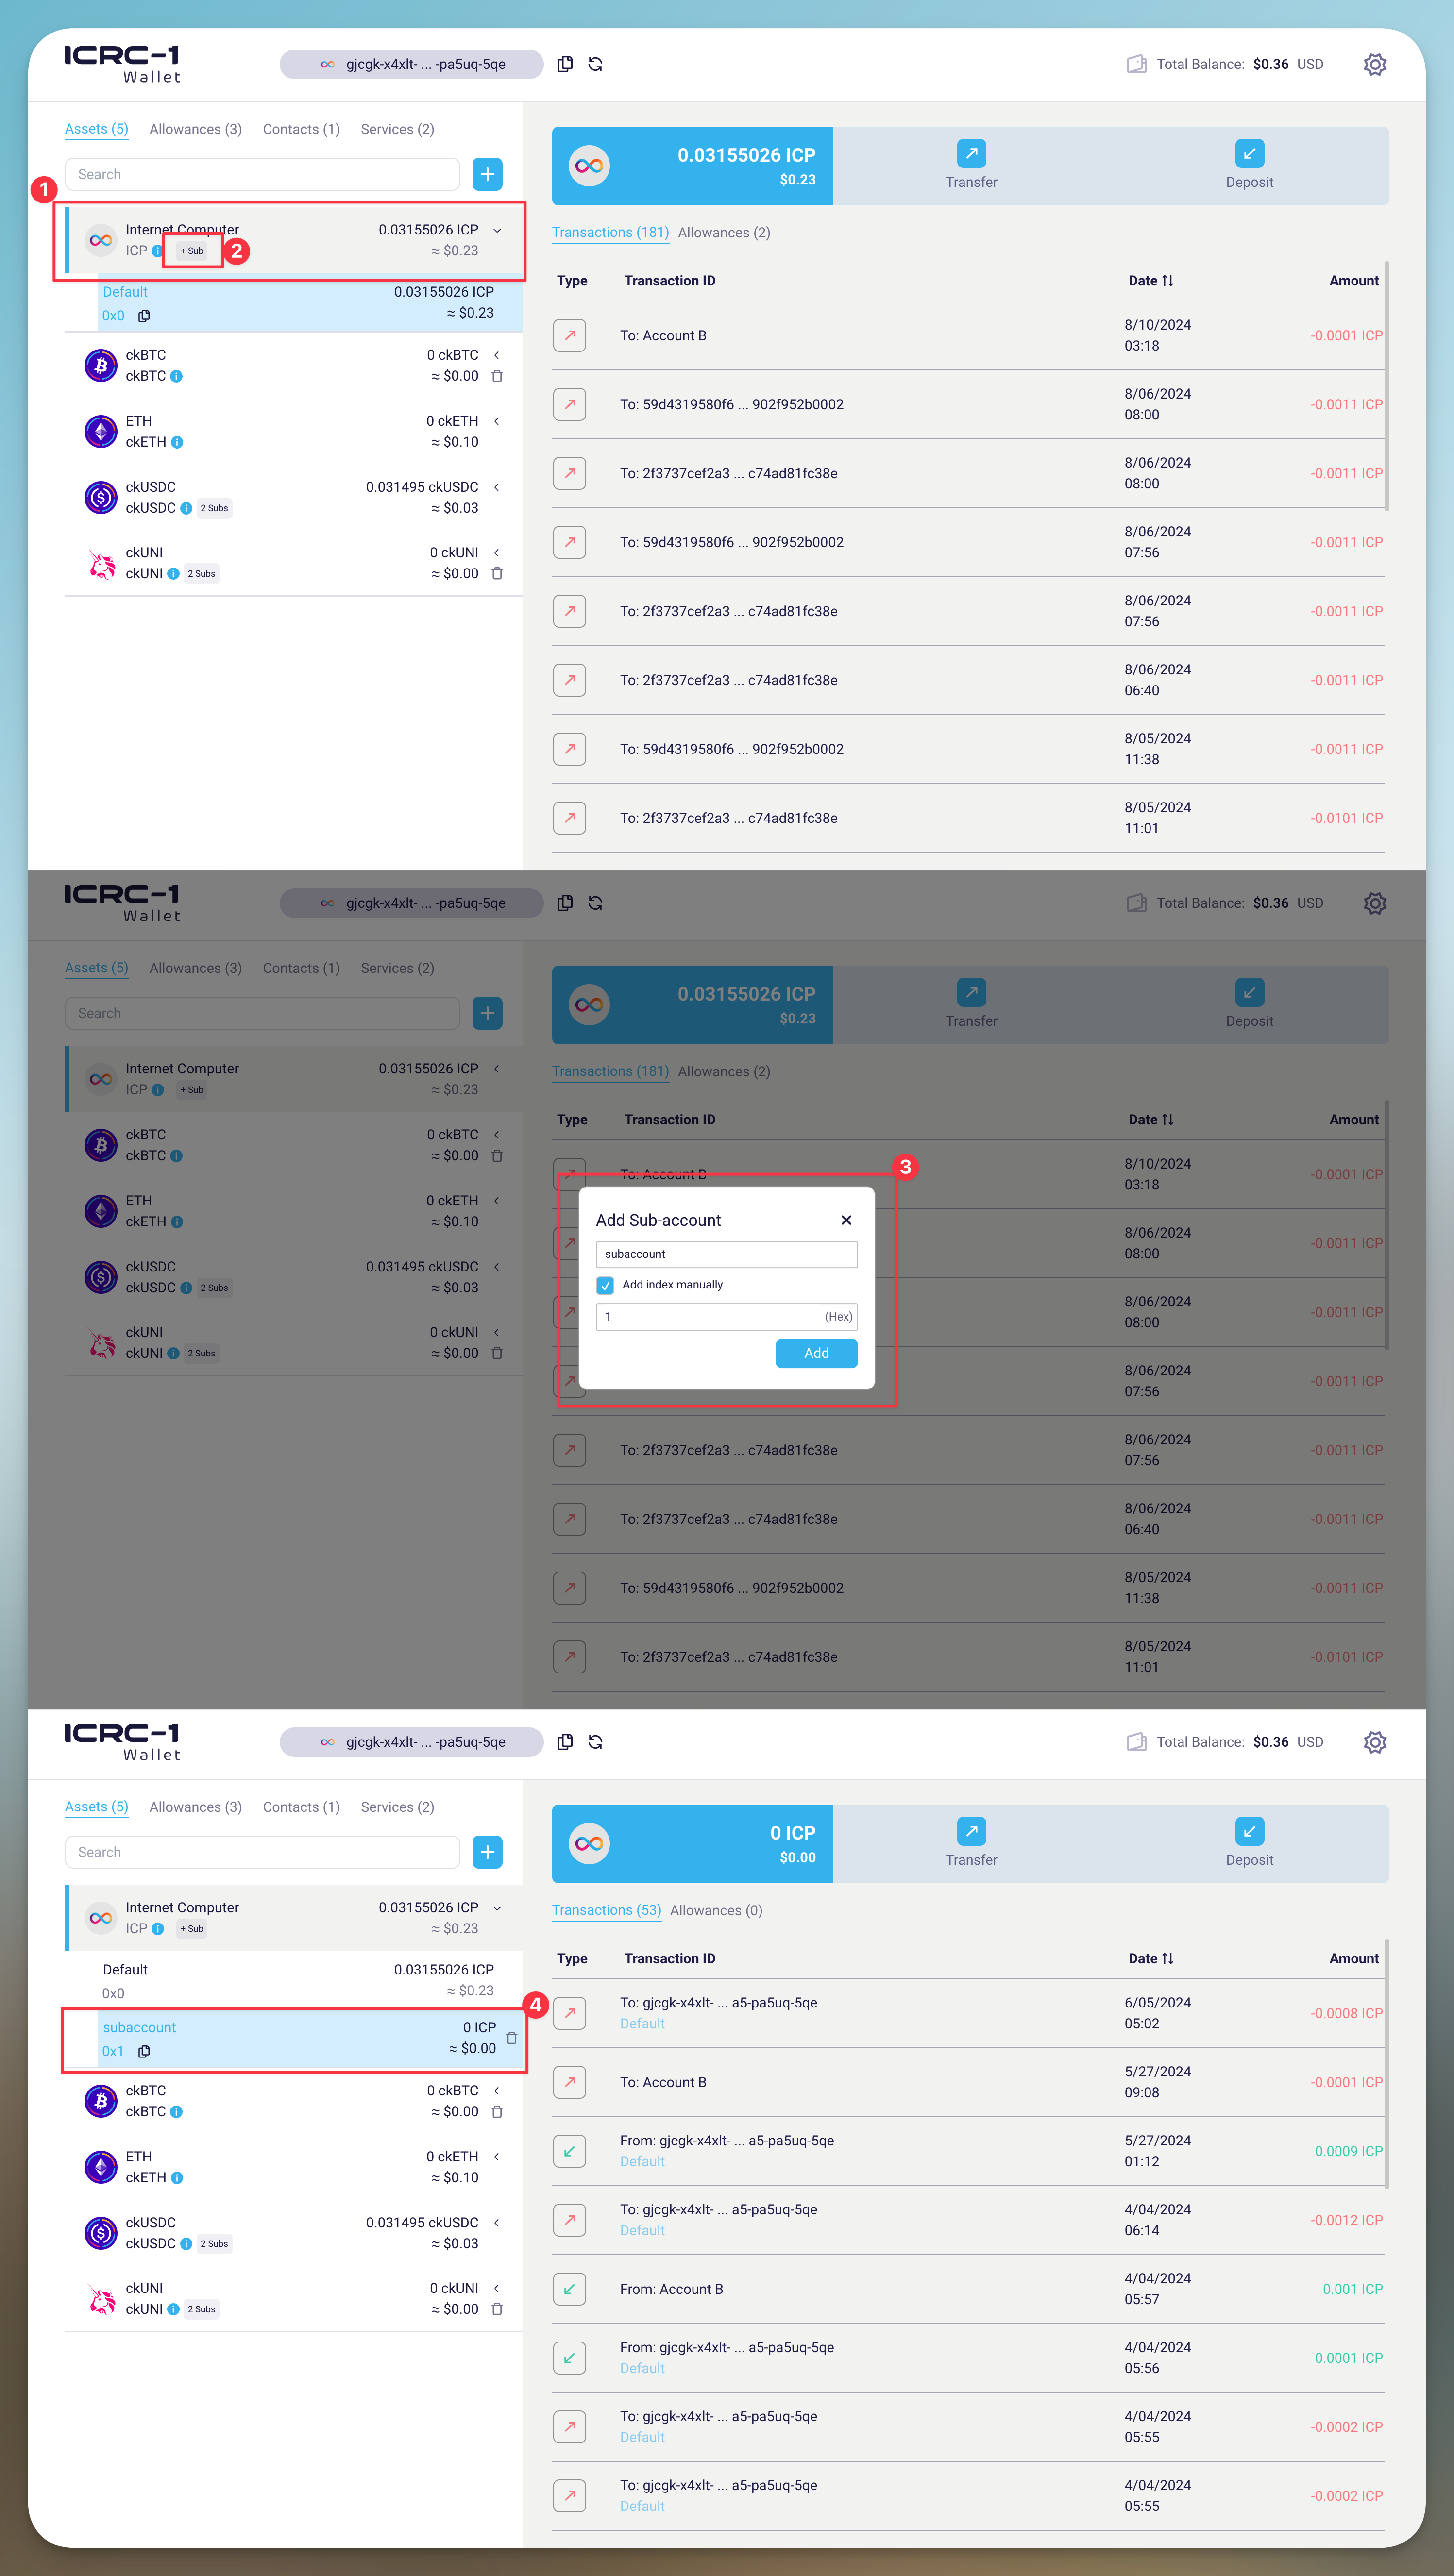
To create a new subaccount:
Select the asset you wish to manage by clicking on it.
Click the button with the label "+Sub" that appears next to the asset's symbol.
Enter a name for your subaccount. This is your personal alias name for the subaccount which is stored in your wallet and which is not public. By default, the wallet will chose the next free index for this subaccount. For example, if you only had the default account so far and are adding the first additional subaccount then the id chosen for it will be 0x1. After that it will be 0x2, etc. After creating the subaccount, you’ll notice that you now have two subaccounts - the default one and the new one.
💡 Display of subaccount ids. Subaccounts in the ICRC-1 standard have an id that is exactly 32 bytes long. The default account's id actually consists of 32 zero-bytes and 0x0 is just an abbreviation. The wallet strips leading "0" characters when displaying subaccount ids. For example, the subaccount id 0x1 actually consists of 31 zero-bytes plus the byte 0x01 but only the last "1" character is displayed.
💡 Numerical indices as subaccounts id. Numerical subaccount indices 0,1,2,.. have to be translated to a 32-byte identifier first. This is done by encoding the numerical value in big-endian byte order first and then left-pad the result with 0-bytes to get to 32 bytes. In this way the subaccount with numerical index 0 is equal to the default account. And, for example, the subaccount with numerical index 256 has the id 0x100.
By default, the wallet uses consecutive numerical indices 1,2,... for the subaccounts that are opened after the default account. For compatibility with other wallets it is important that the other wallet creates subaccount ids in the same way. Otherwise, subaccounts created by this wallet may not be found by the other wallet and vice-versa.
In step 3 above, you can manually override the subaccount id by clicking the "Add index manually" checkbox. This opens a field for an arbitrary hex string. The hex string is entered without a 0x prefix and is limited to 32 bytes, i.e. 64 hex characters. Normally, if you just want to create personal subaccounts to segregate funds by purpose, you don’t need this feature. It is an advanced feature for special situations. For example, if you want to recover funds in a subaccount that was created by a wallet that used a different numbering scheme.
Viewing Transactions in Subaccounts
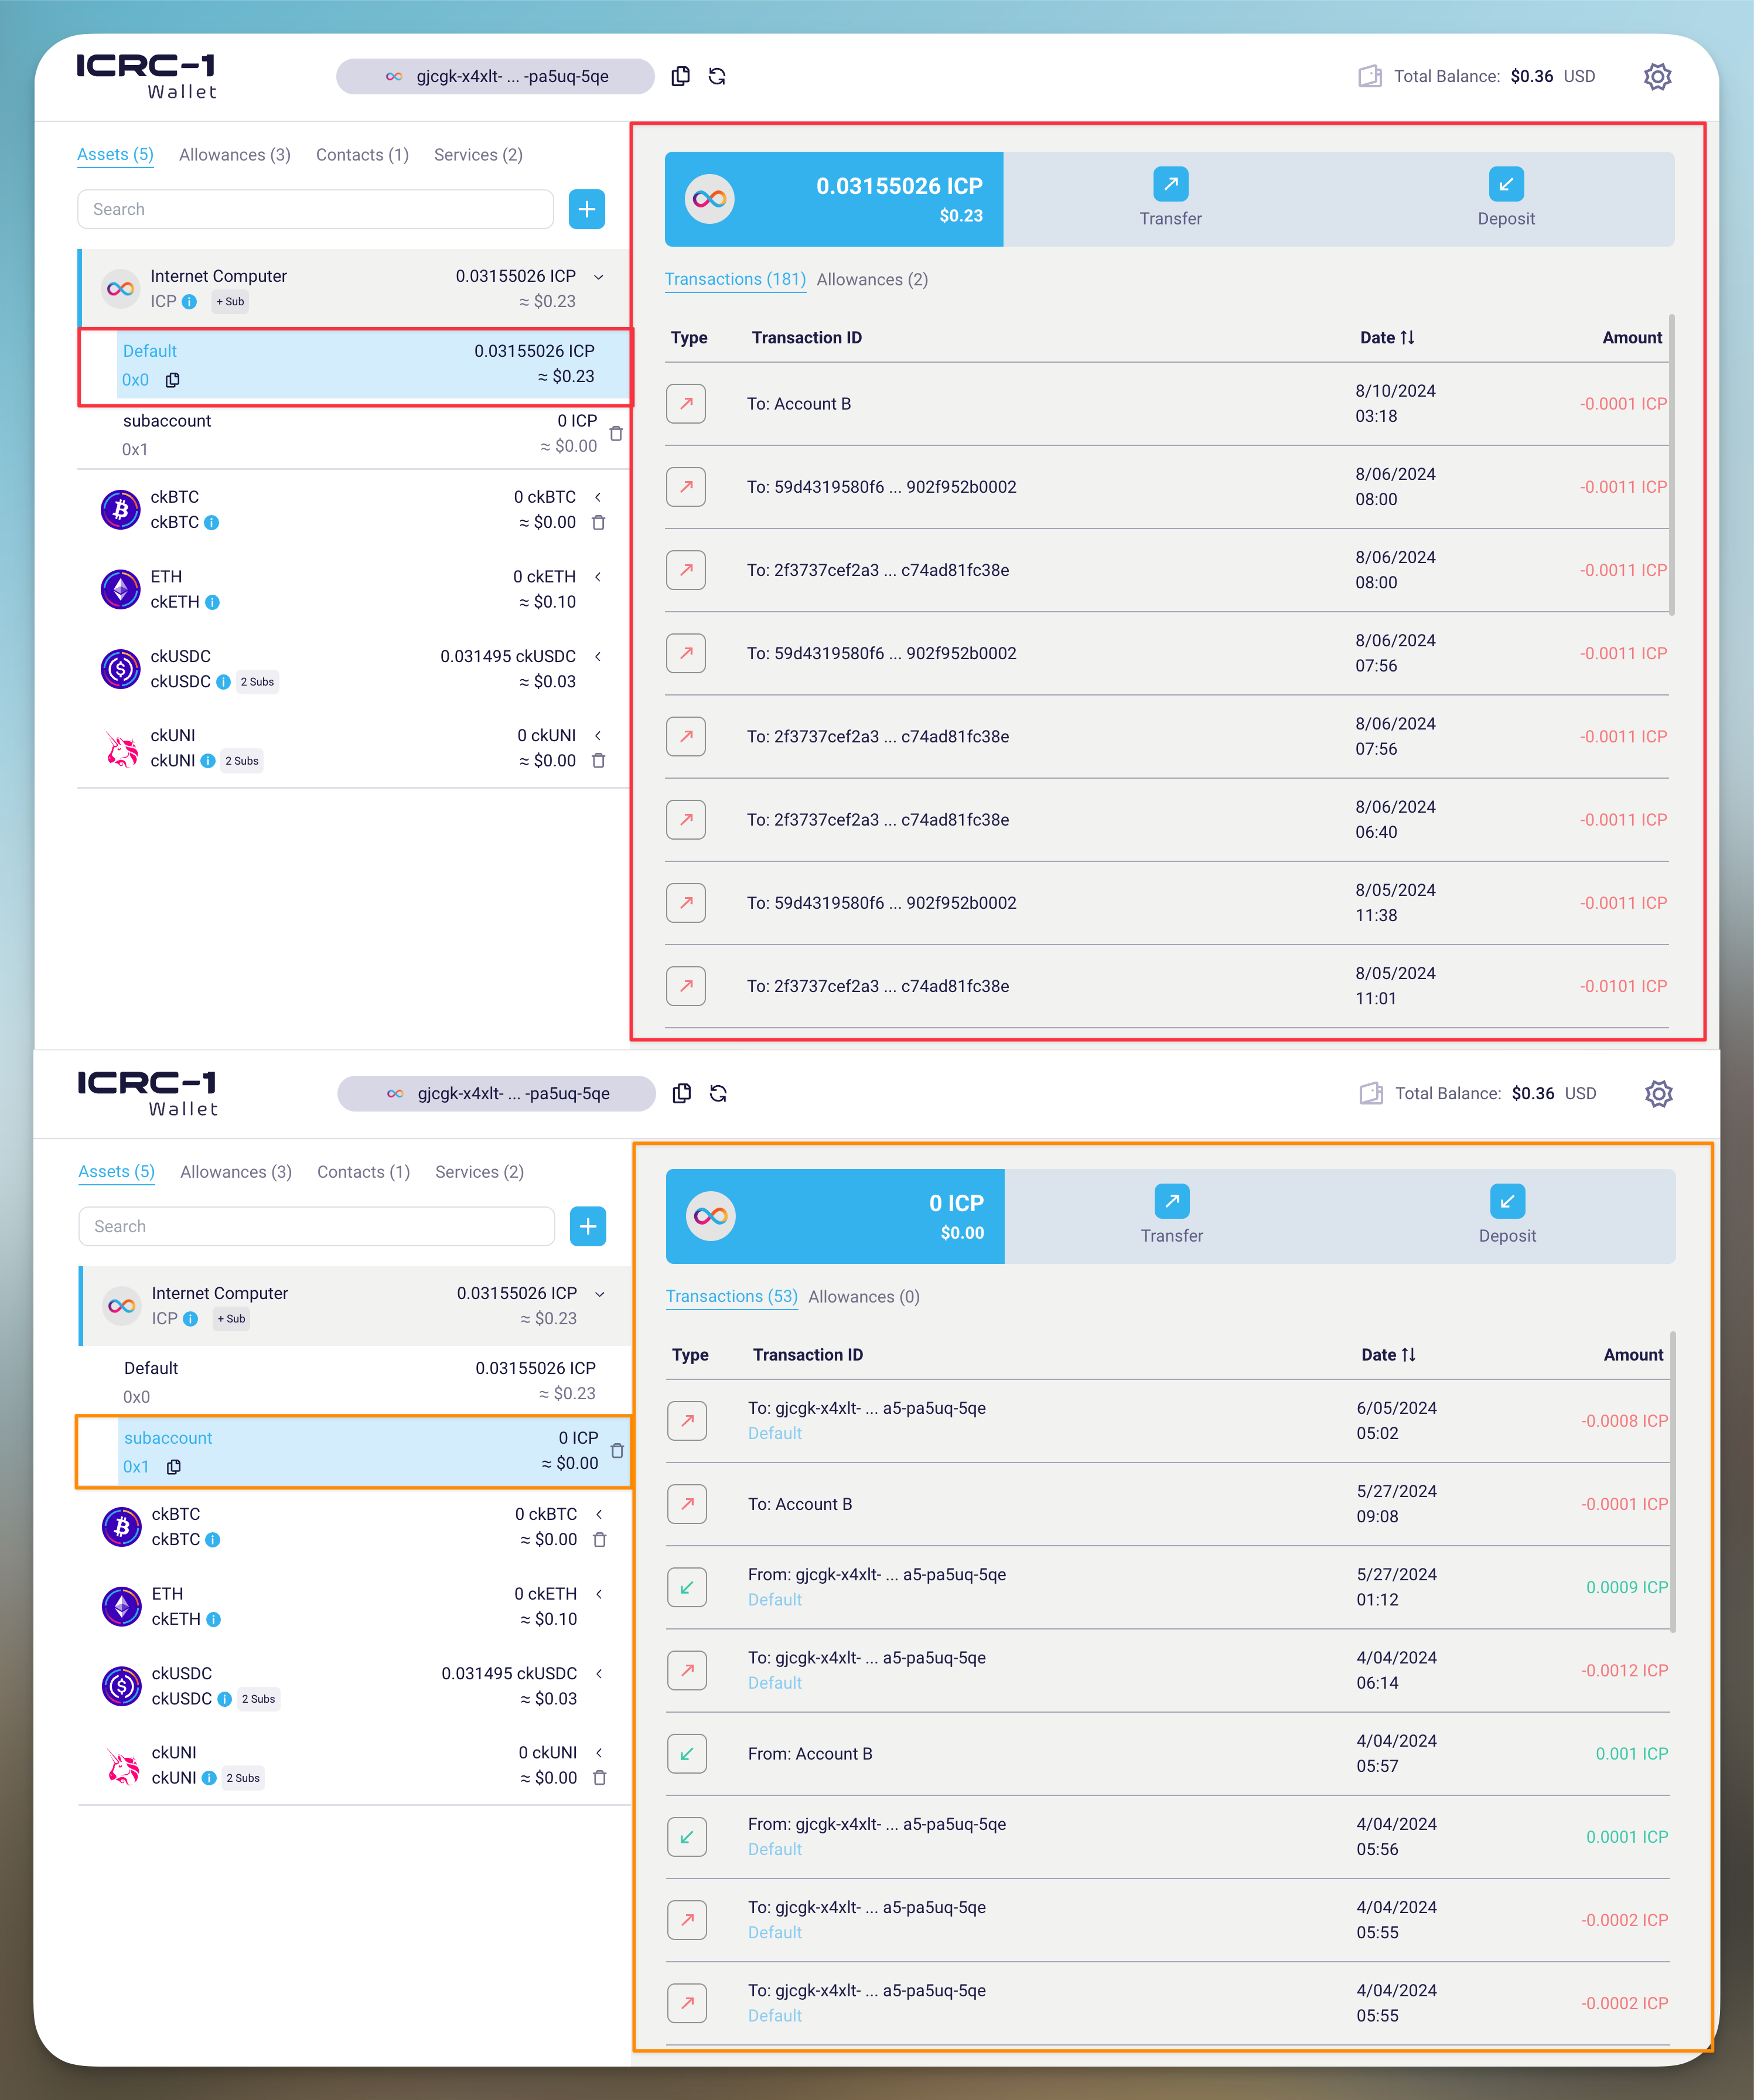
Once your subaccounts are set up, you can view the transaction history for each one individually. This feature allows you to track the activity within each subaccount separately, making it easier to monitor your funds.
For instance, if you’re on the default subaccount of an asset, you'll see all the transactions associated with default subaccount. However, if you switch to another subaccount, the transaction history updates to reflect only the activities within that specific subaccount.
Transferring Funds Between Subaccounts
To transfer funds within your own subaccounts:
Go to the asset in which you want to transfer funds. Select the subaccount from which you want to transfer.
Click the Transfer button. The Transfer dialog open and the subaccount is already pre-selected in the From section.
Click Transfer to own account in the To section.
Choose the subaccount you want to transfer to.
Click Next.
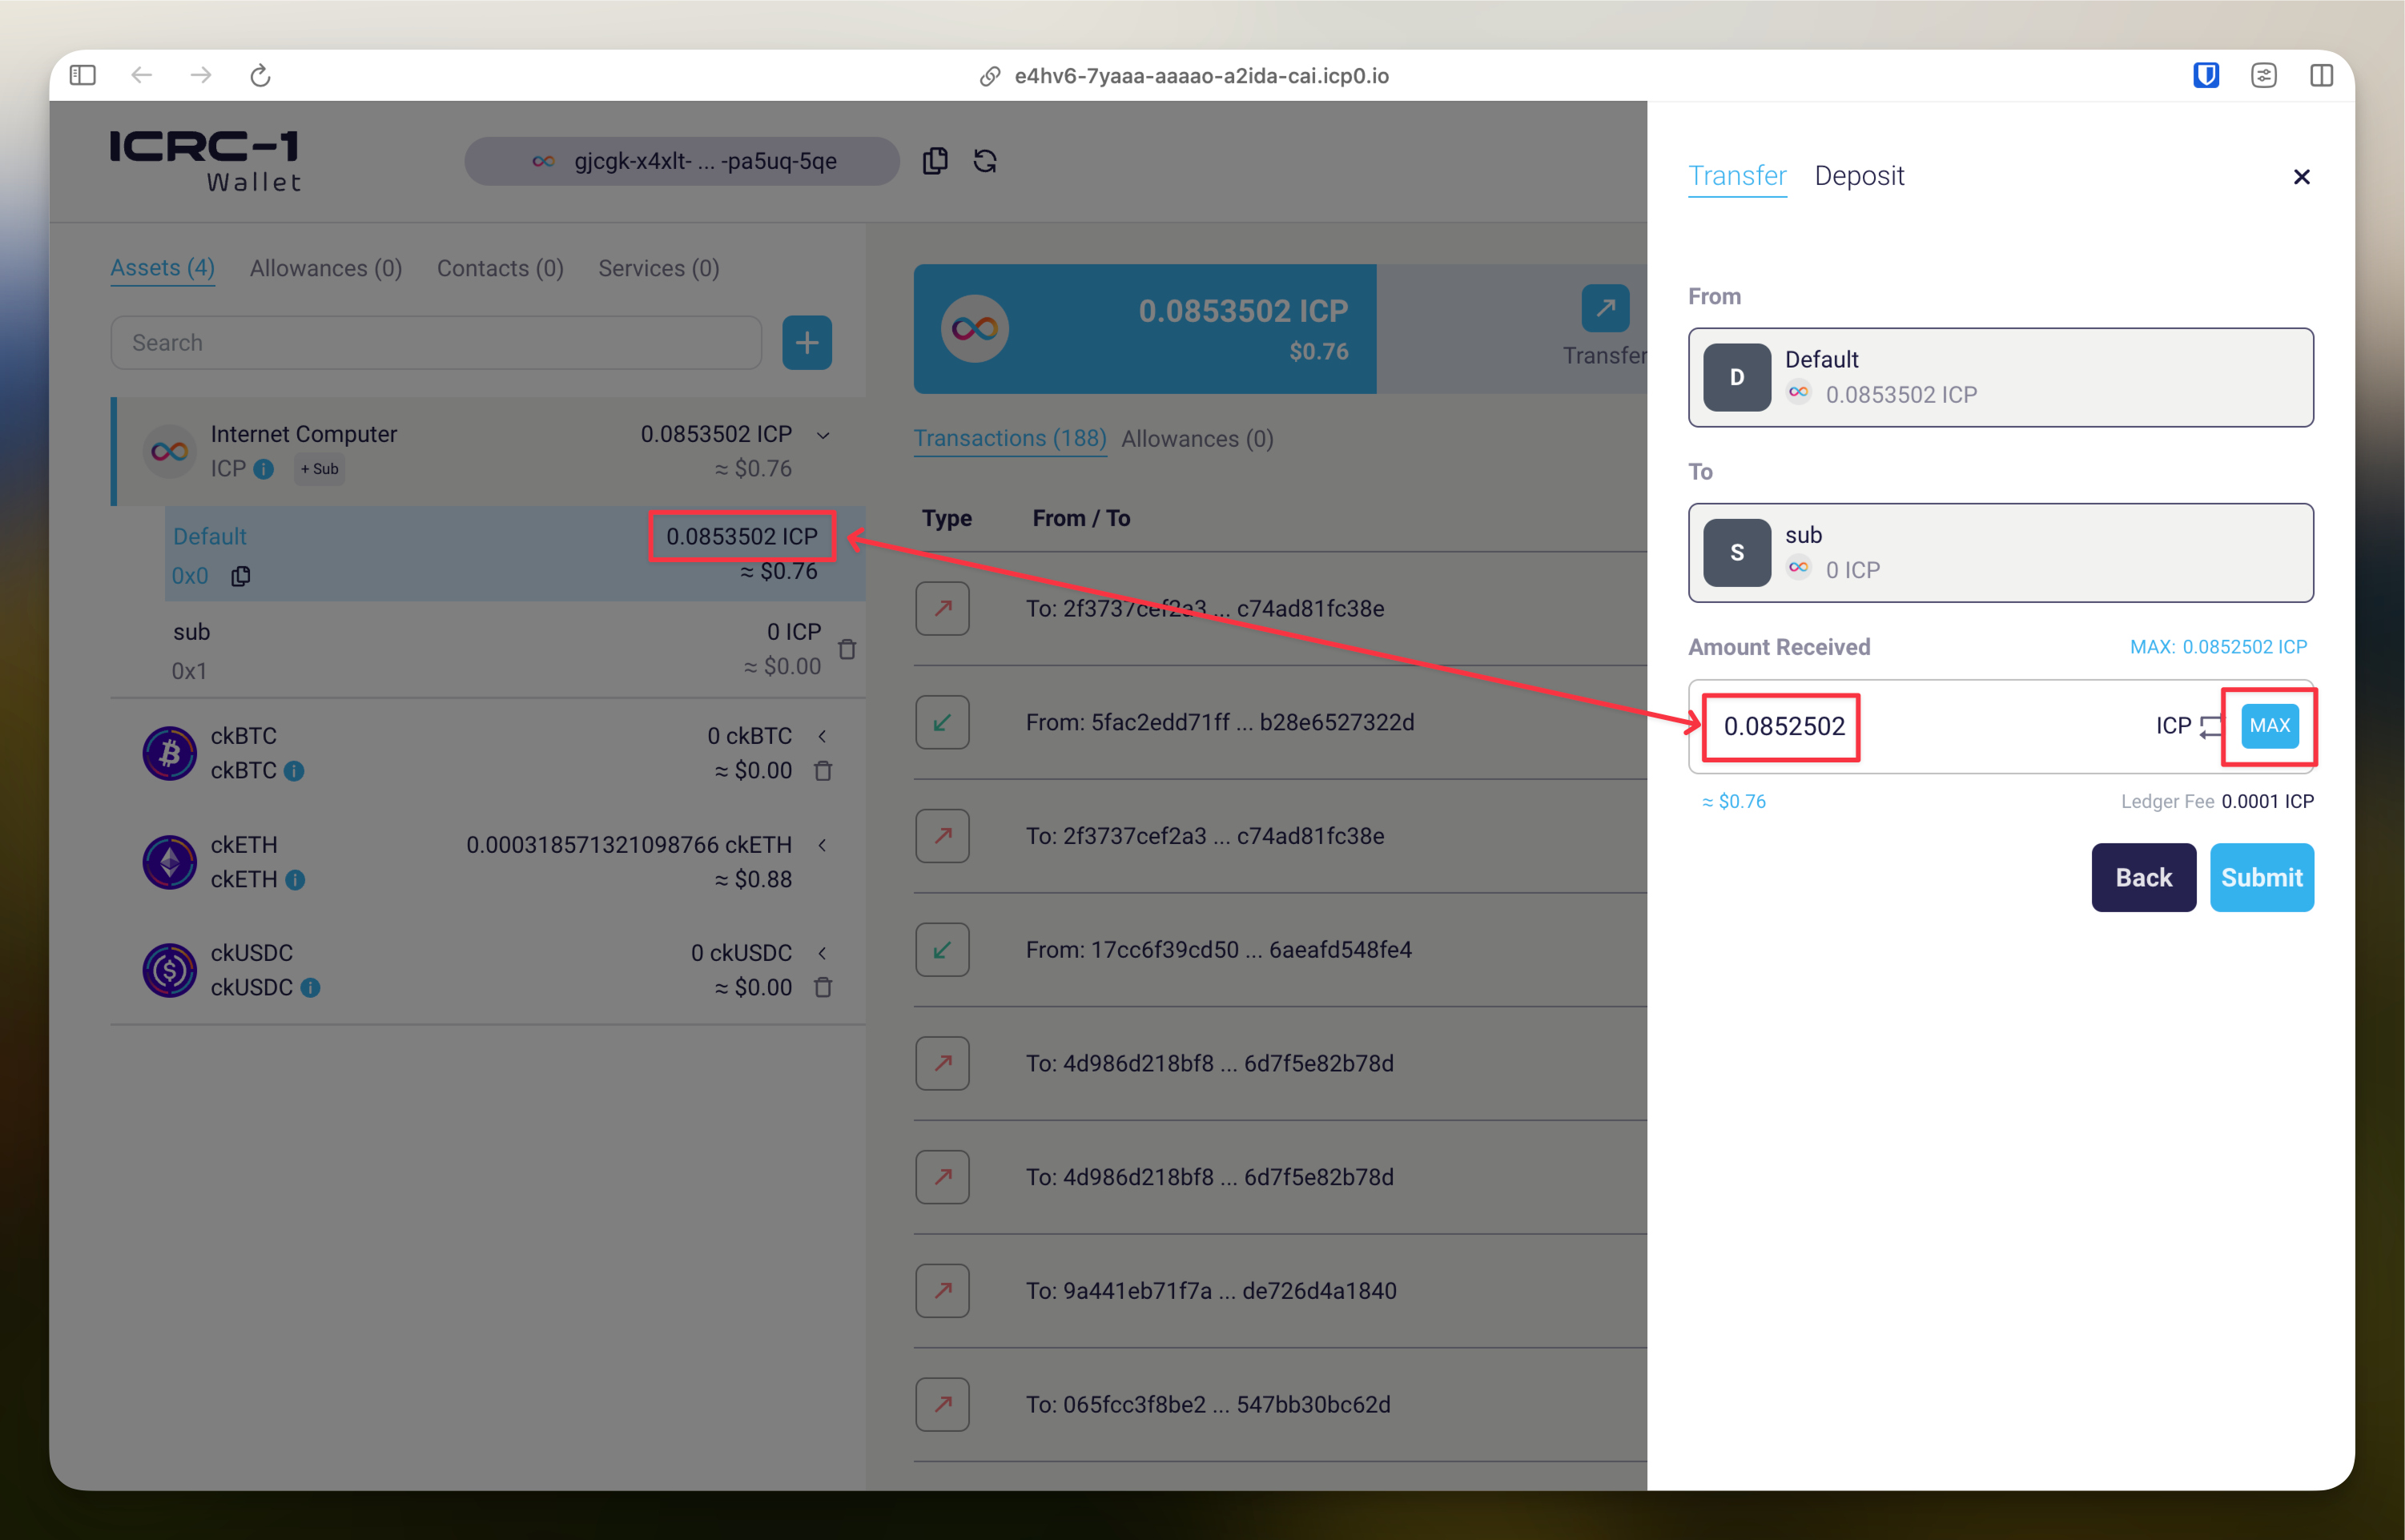
Enter the amount that should arrive in the receiving subaccount.
Click Submit.
You can only transfer funds between subaccounts of the same asset. For example, you can transfer ckUSDC from one ckUSDC subaccount to another, but not from ckUSDC to a ckBTC subaccount.
The amount specified is the amount received. The ledger fee, which is printed below the amount field for informational purposes, is subtracted from the sending subaccount.
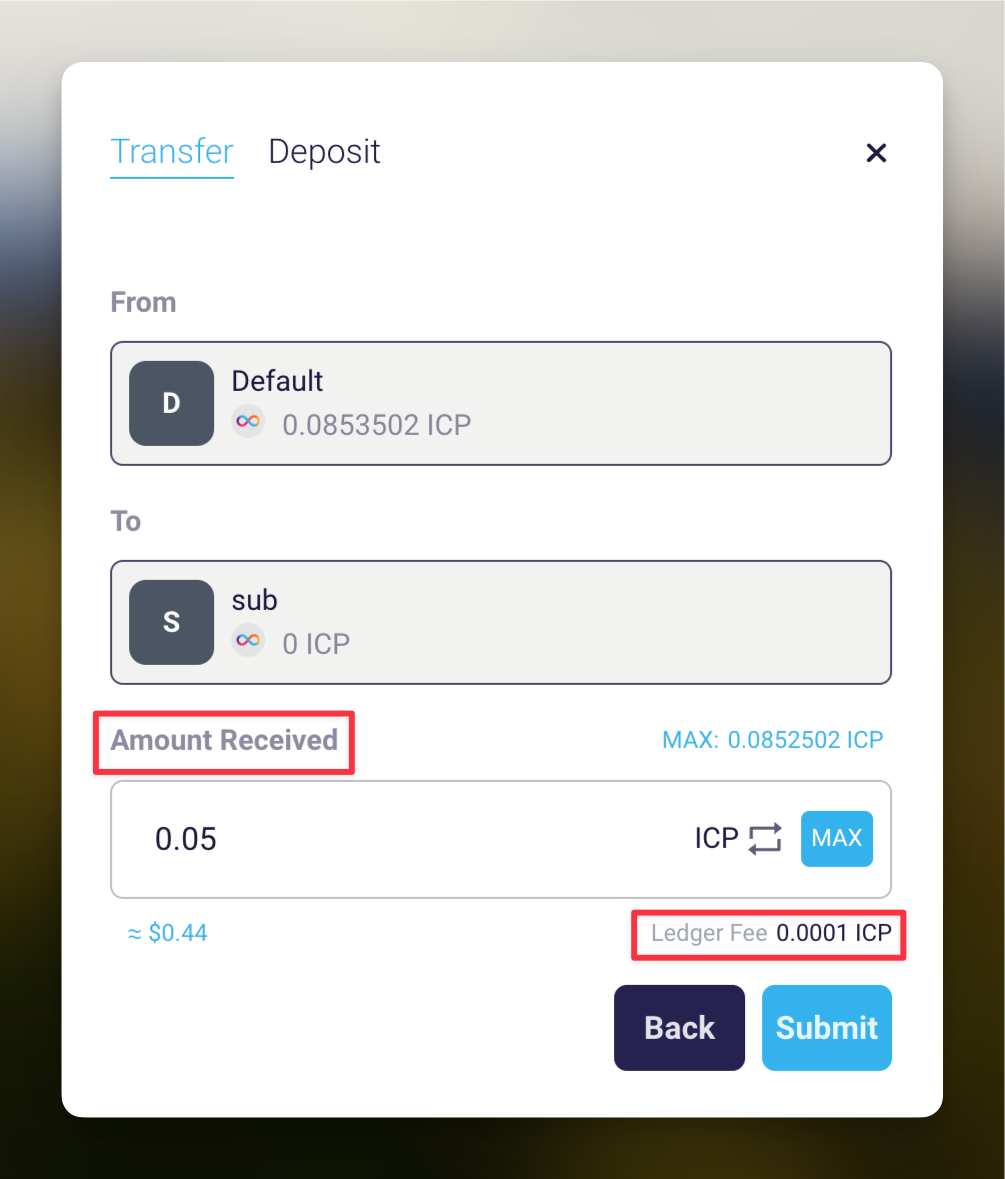
The MAX button fills in the maximal amount that can be entered, which is equal to the balance in the spending subaccount minus the ledger fee.
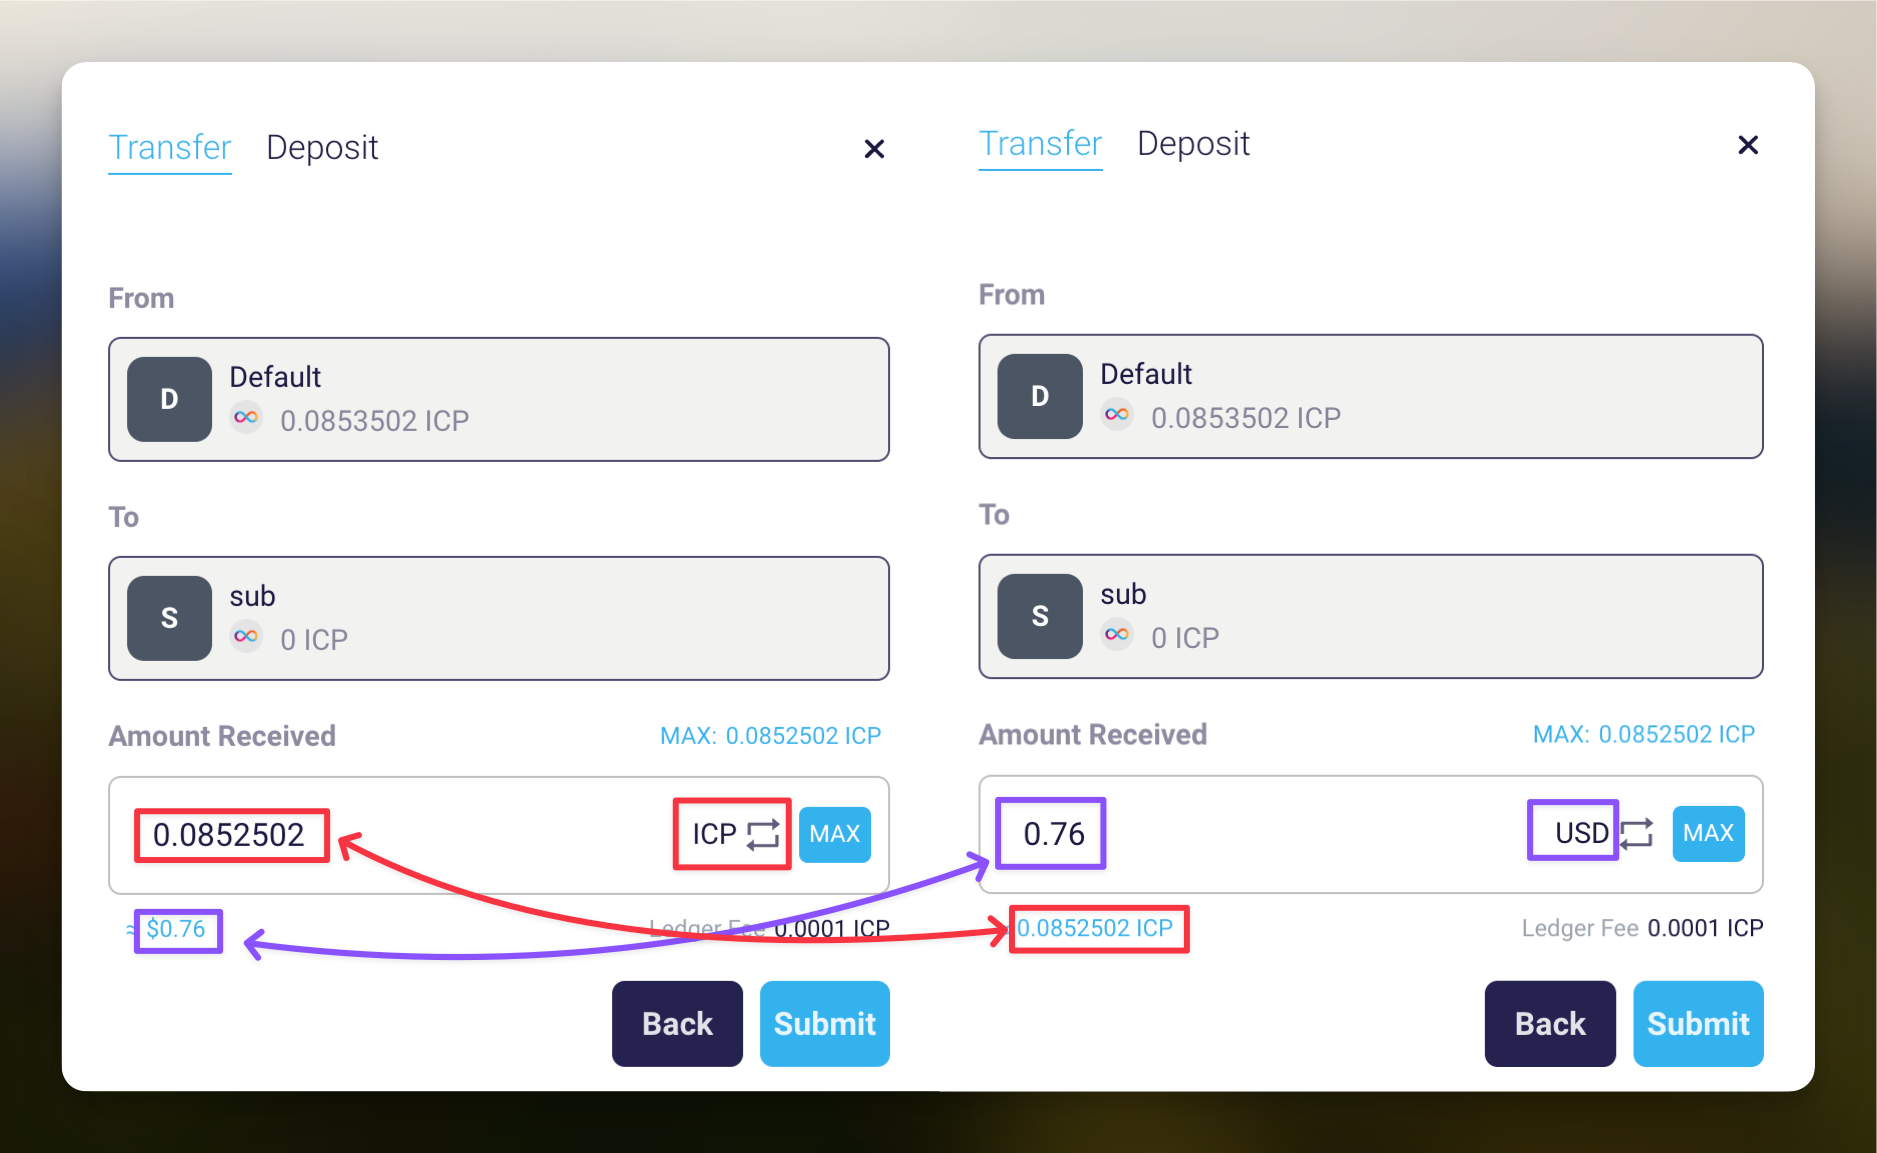
By clicking on the double-arrow symbol we can switch between entering a token amount and entering a USD amount. If a USD amount is chosen then the wallet will automatically convert to a token amount based on current prices and will send the token amount. Obviously, this works only for tokens for which the wallet has a source for the exchange rate.
Depositing Funds into Subaccounts
To deposit funds from outside directly into a subaccount you can export a single identifier which encodes your principal and the subaccount and give this identifier to the sender. The identifier is defined in the ICRC-1 standard and is accepted as the sending destination by ICRC-1 compatible wallets.
💡 ICRC-1 Accounts. In ICRC-1 terminology the identifier is simply called “Account”. An Account does not encode the asset nor the amount. It only encodes principal and subaccount id.
To see the Account:
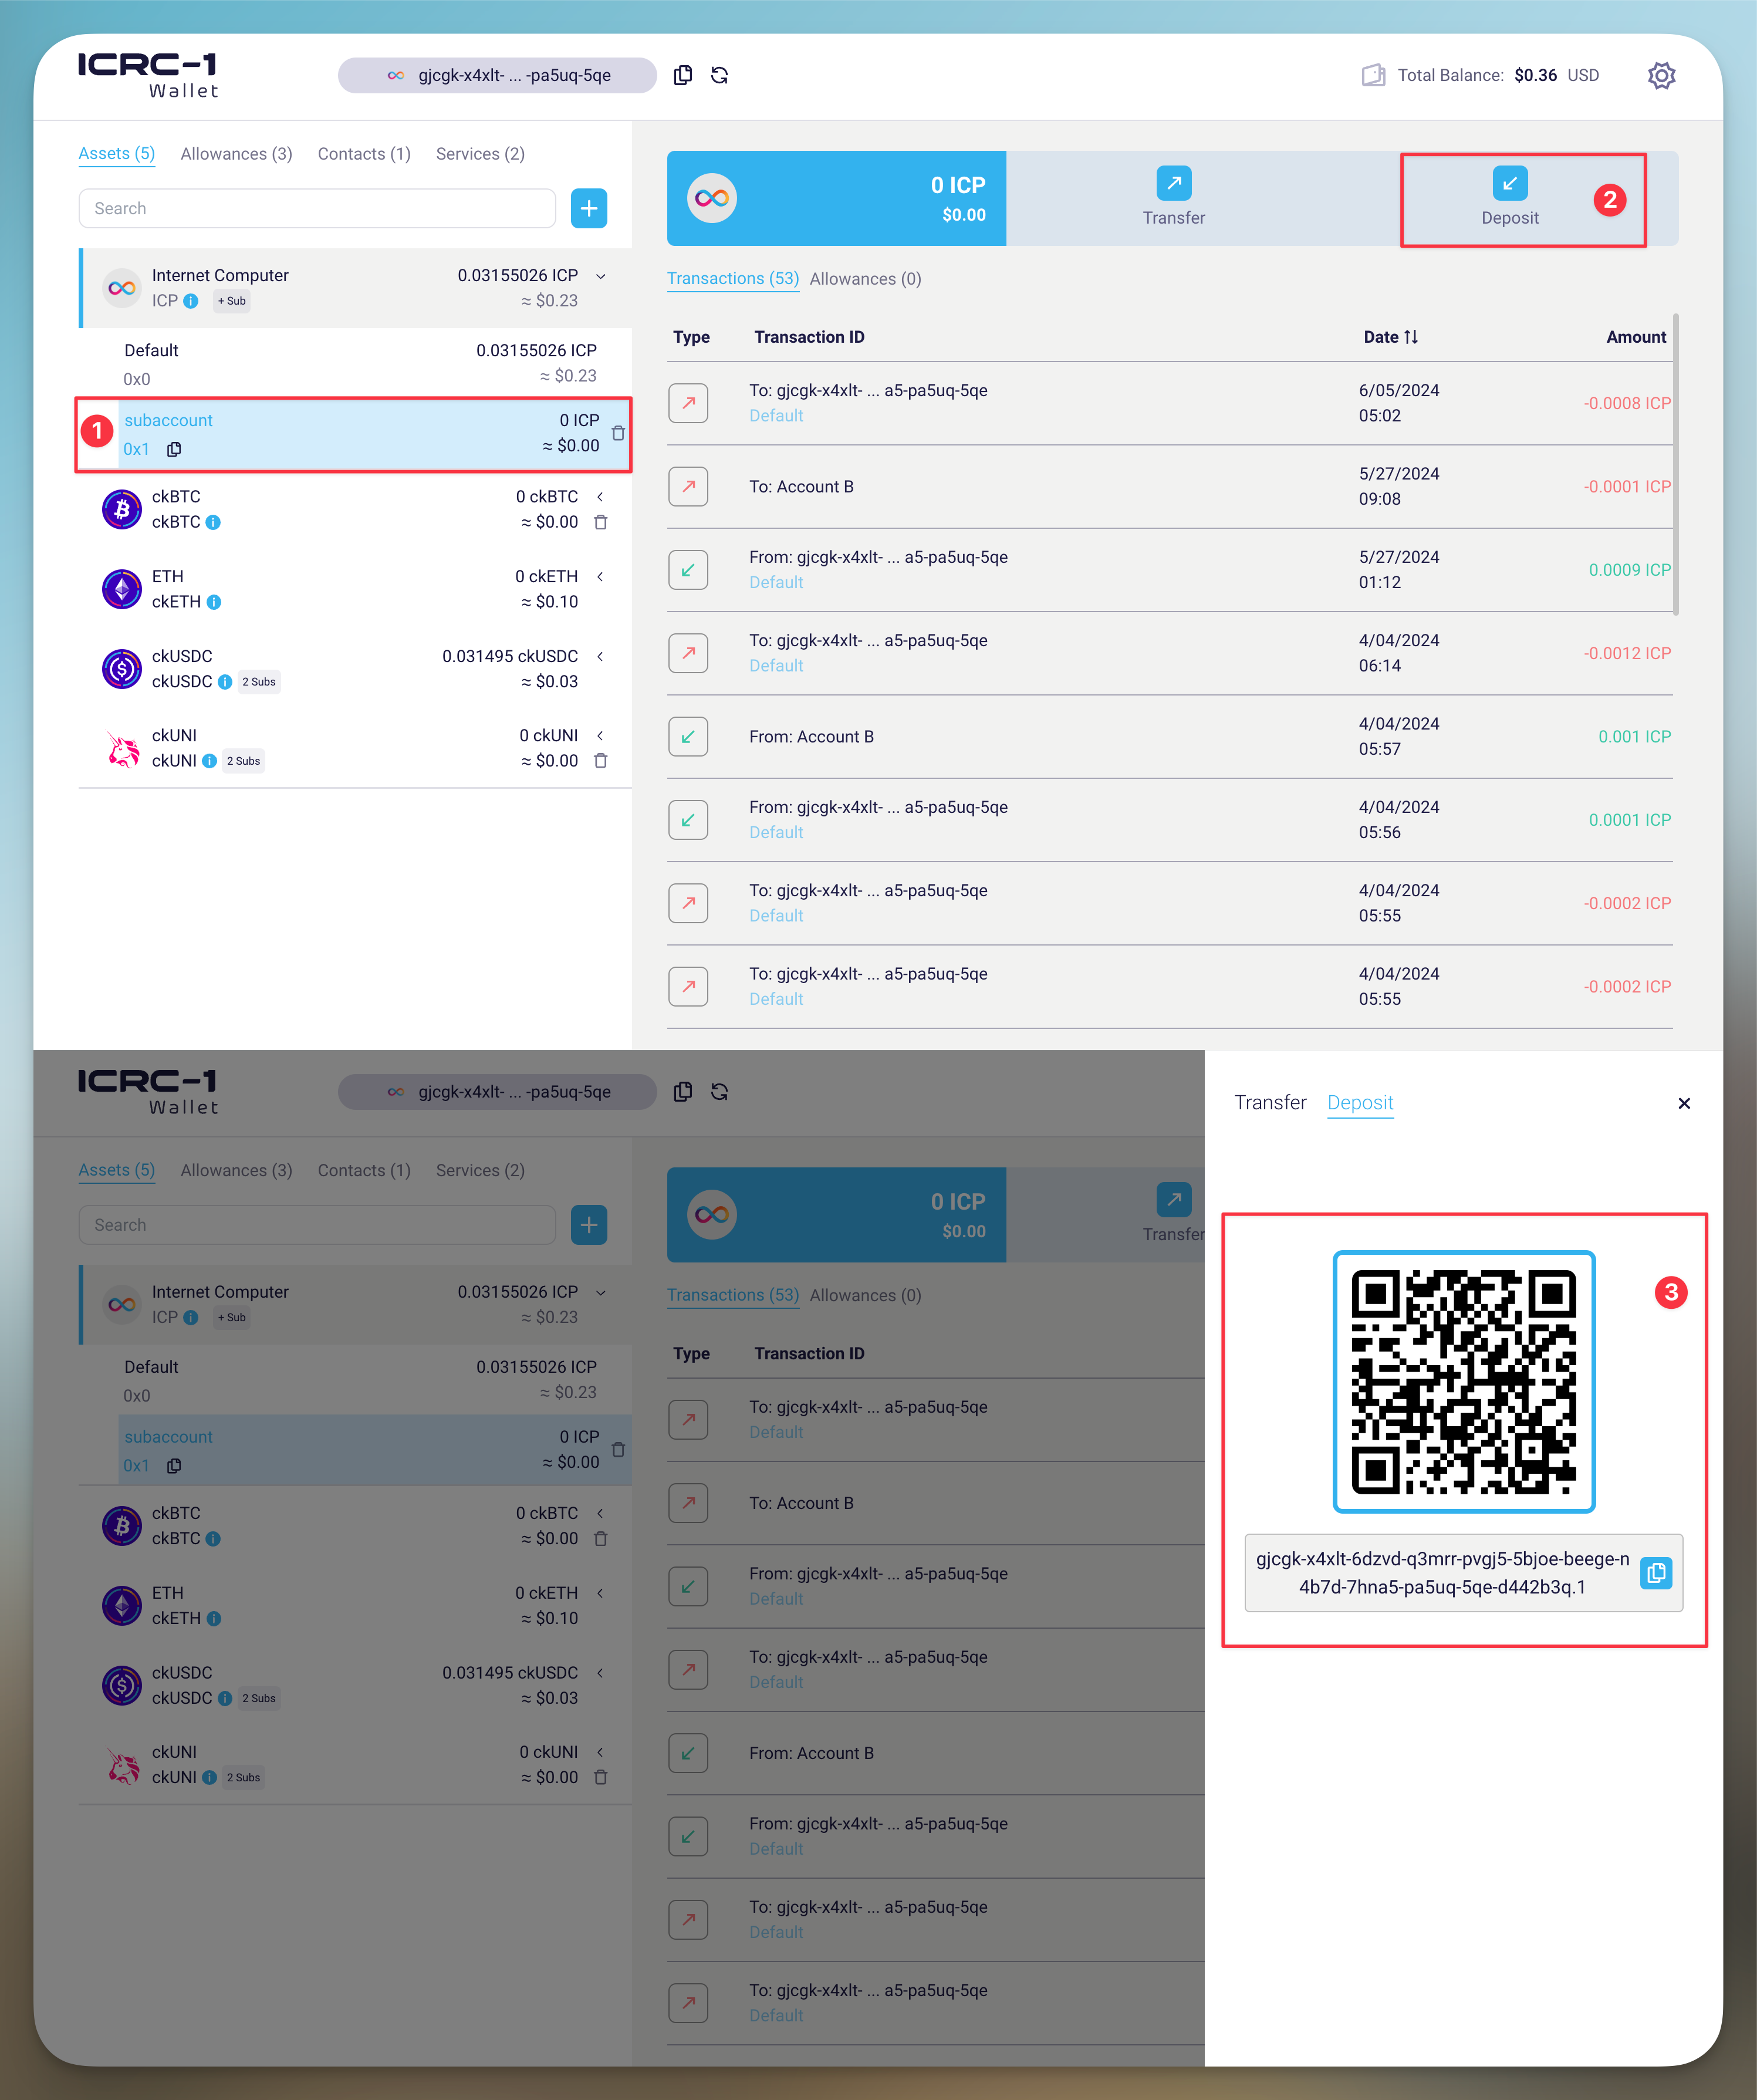
Select the subaccount you want to deposit into.
Click the Deposit button.
You will see the ICRC-1 account in QR code form and in text form. Both forms encode the same information.
💡 Legacy account id. If the asset is ICP then below the ICRC-1 account you will also see a “Legacy identifier”. This is also known as “account id” and was used in the early stages of the ICP ledger. Some wallet may still not accept ICRC-1 accounts for ICP transfers and that’s why the old “account id” is displayed here as an alternative.
Deleting subaccounts
Subaccounts can be deleted by clicking on the trash bin icon next to the subaccount’s balance. But note that the button is only available if the subaccount is empty. To empty a subaccount you can simply transfer all its remaining balance to a different subaccount such as the default account. The “MAX” button in the transfer window is very convenient to do that because it takes into account the ledger fee and completely empties the sending account.
Final note
When designing the wallet interface we decided for a hierarchical order that puts the subaccounts under the assets. This means that you can, for each asset, define a different set of subaccounts, whether it is just a different number of subaccounts or if the subaccount ids differ for other reasons. We believe that this is the natural way that most users think of it.
Taking into account the technical details of the ICRC-1 standard, a alternative approach would have been possible. That is a hierarchy that puts the assets under the subaccounts. In this approach you would select a subaccount first, for example in the top row of the wallet near where your principal is shown. In the asset list there would be only one balance per asset. That balance is the balance in the subaccount that is chosen at the top. As you change the subaccount at the top, all balances in the asset list would update.
The second approach has a slightly different intuition. It can be understood as choosing a "sub principal" that owns its own set of assets. ICRC-1 makes this possible because the same ICRC-1 Account, the pair composed of principal and subaccount id, is valid across all ICRC-1 assets.
We have chosen the first approach because we believe most users would prefer it. If you like the other approach, have used or would like to use a wallet that works that way, or see other advantages then please let us know in the comments.
Conclusion
By using subaccounts, you can better organize and manage your assets within the ICRC-1 wallet. Whether it's for different financial goals or simply keeping your funds organized, subaccounts offer flexibility and control. Transfers between own subaccounts are fast and seamless. Remember to explore the transaction histories of each subaccount, and make sure you're using the deposit addresses for the individual subaccount in which you want the deposited funds to land.
Thank you for following along! We’ll see you in the next blog.