
How to Make Deposits and Withdrawals on the DailyBid Exchange
Streamline Your Trading Experience: A Step-by-Step Guide to Deposits and Withdrawals on DailyBid


In this post, we’ll walk through making deposits and withdrawals on the DailyBid exchange from and to an external ICRC-1 wallet.
Logging Into DailyBid Exchange
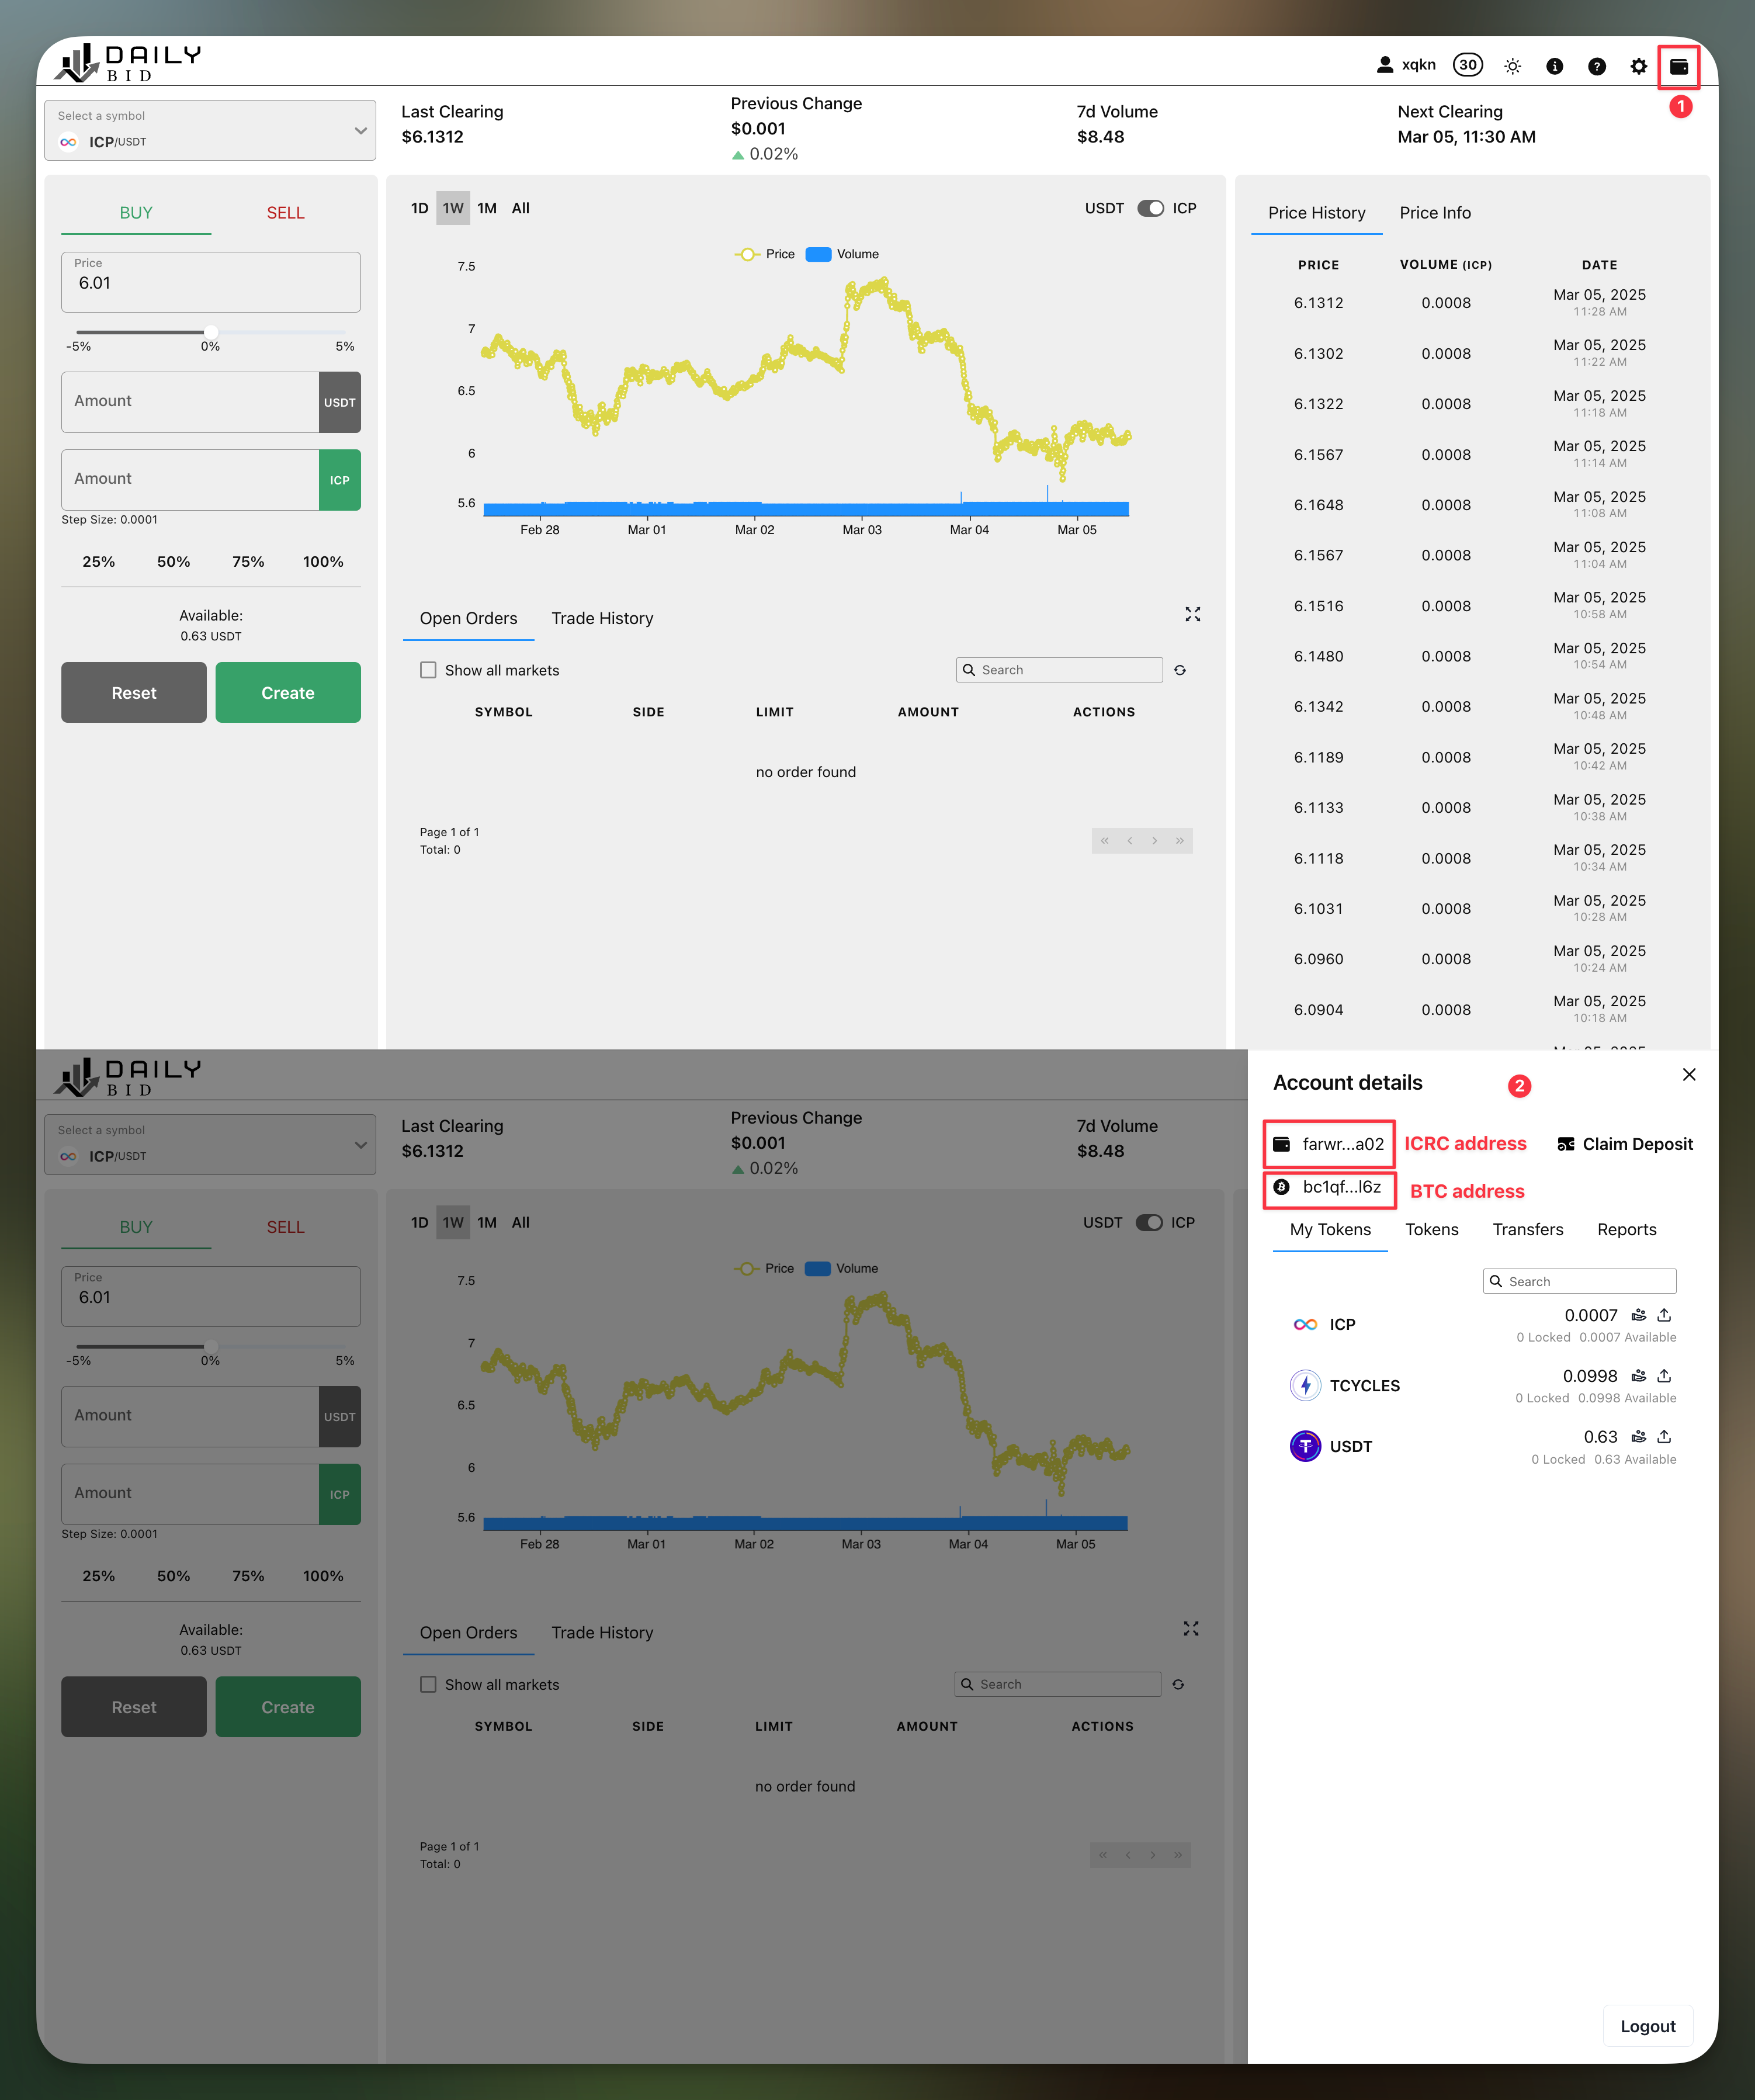
Upon logging into the DailyBid exchange, you’ll notice that the wallet is empty. At the top of the wallet, you’ll see your wallet account details.
Wallet Account: Your personal ICRC-1 subaccount of the auction backend which is tied to your user principal. You can either transfer funds to it or set up an allowance with this account as the spender.
Understanding the Wallet Structure
The Wallet Account is an ICRC-1 subaccount of the auction backend. It is personal to you because it has your User Principal embedded in its subaccount id. You can use this as a deposit account by transferring ICRC-1 tokens into it. And you can use it to make deposits via allowances by configuring this account as the “Spender” of the allowance.
Additionally, if you wish to deposit BTC, your wallet will also have a dedicated BTC address for direct Bitcoin transfers.
Depositing BTC Directly
In addition to ICRC tokens, DailyBid also supports direct Bitcoin (BTC) deposits. Users can send BTC directly to their wallet without needing to convert it into an ICRC token first.
Deposit via Push Transfer
Let’s walk through the deposit process. You can use any wallet that supports sending to ICRC-1 accounts (not only sending to principals). For example, Oisy and the NNS dApp allow that. In this tutorial we use the open-source web wallet: the ICRC-1 wallet.
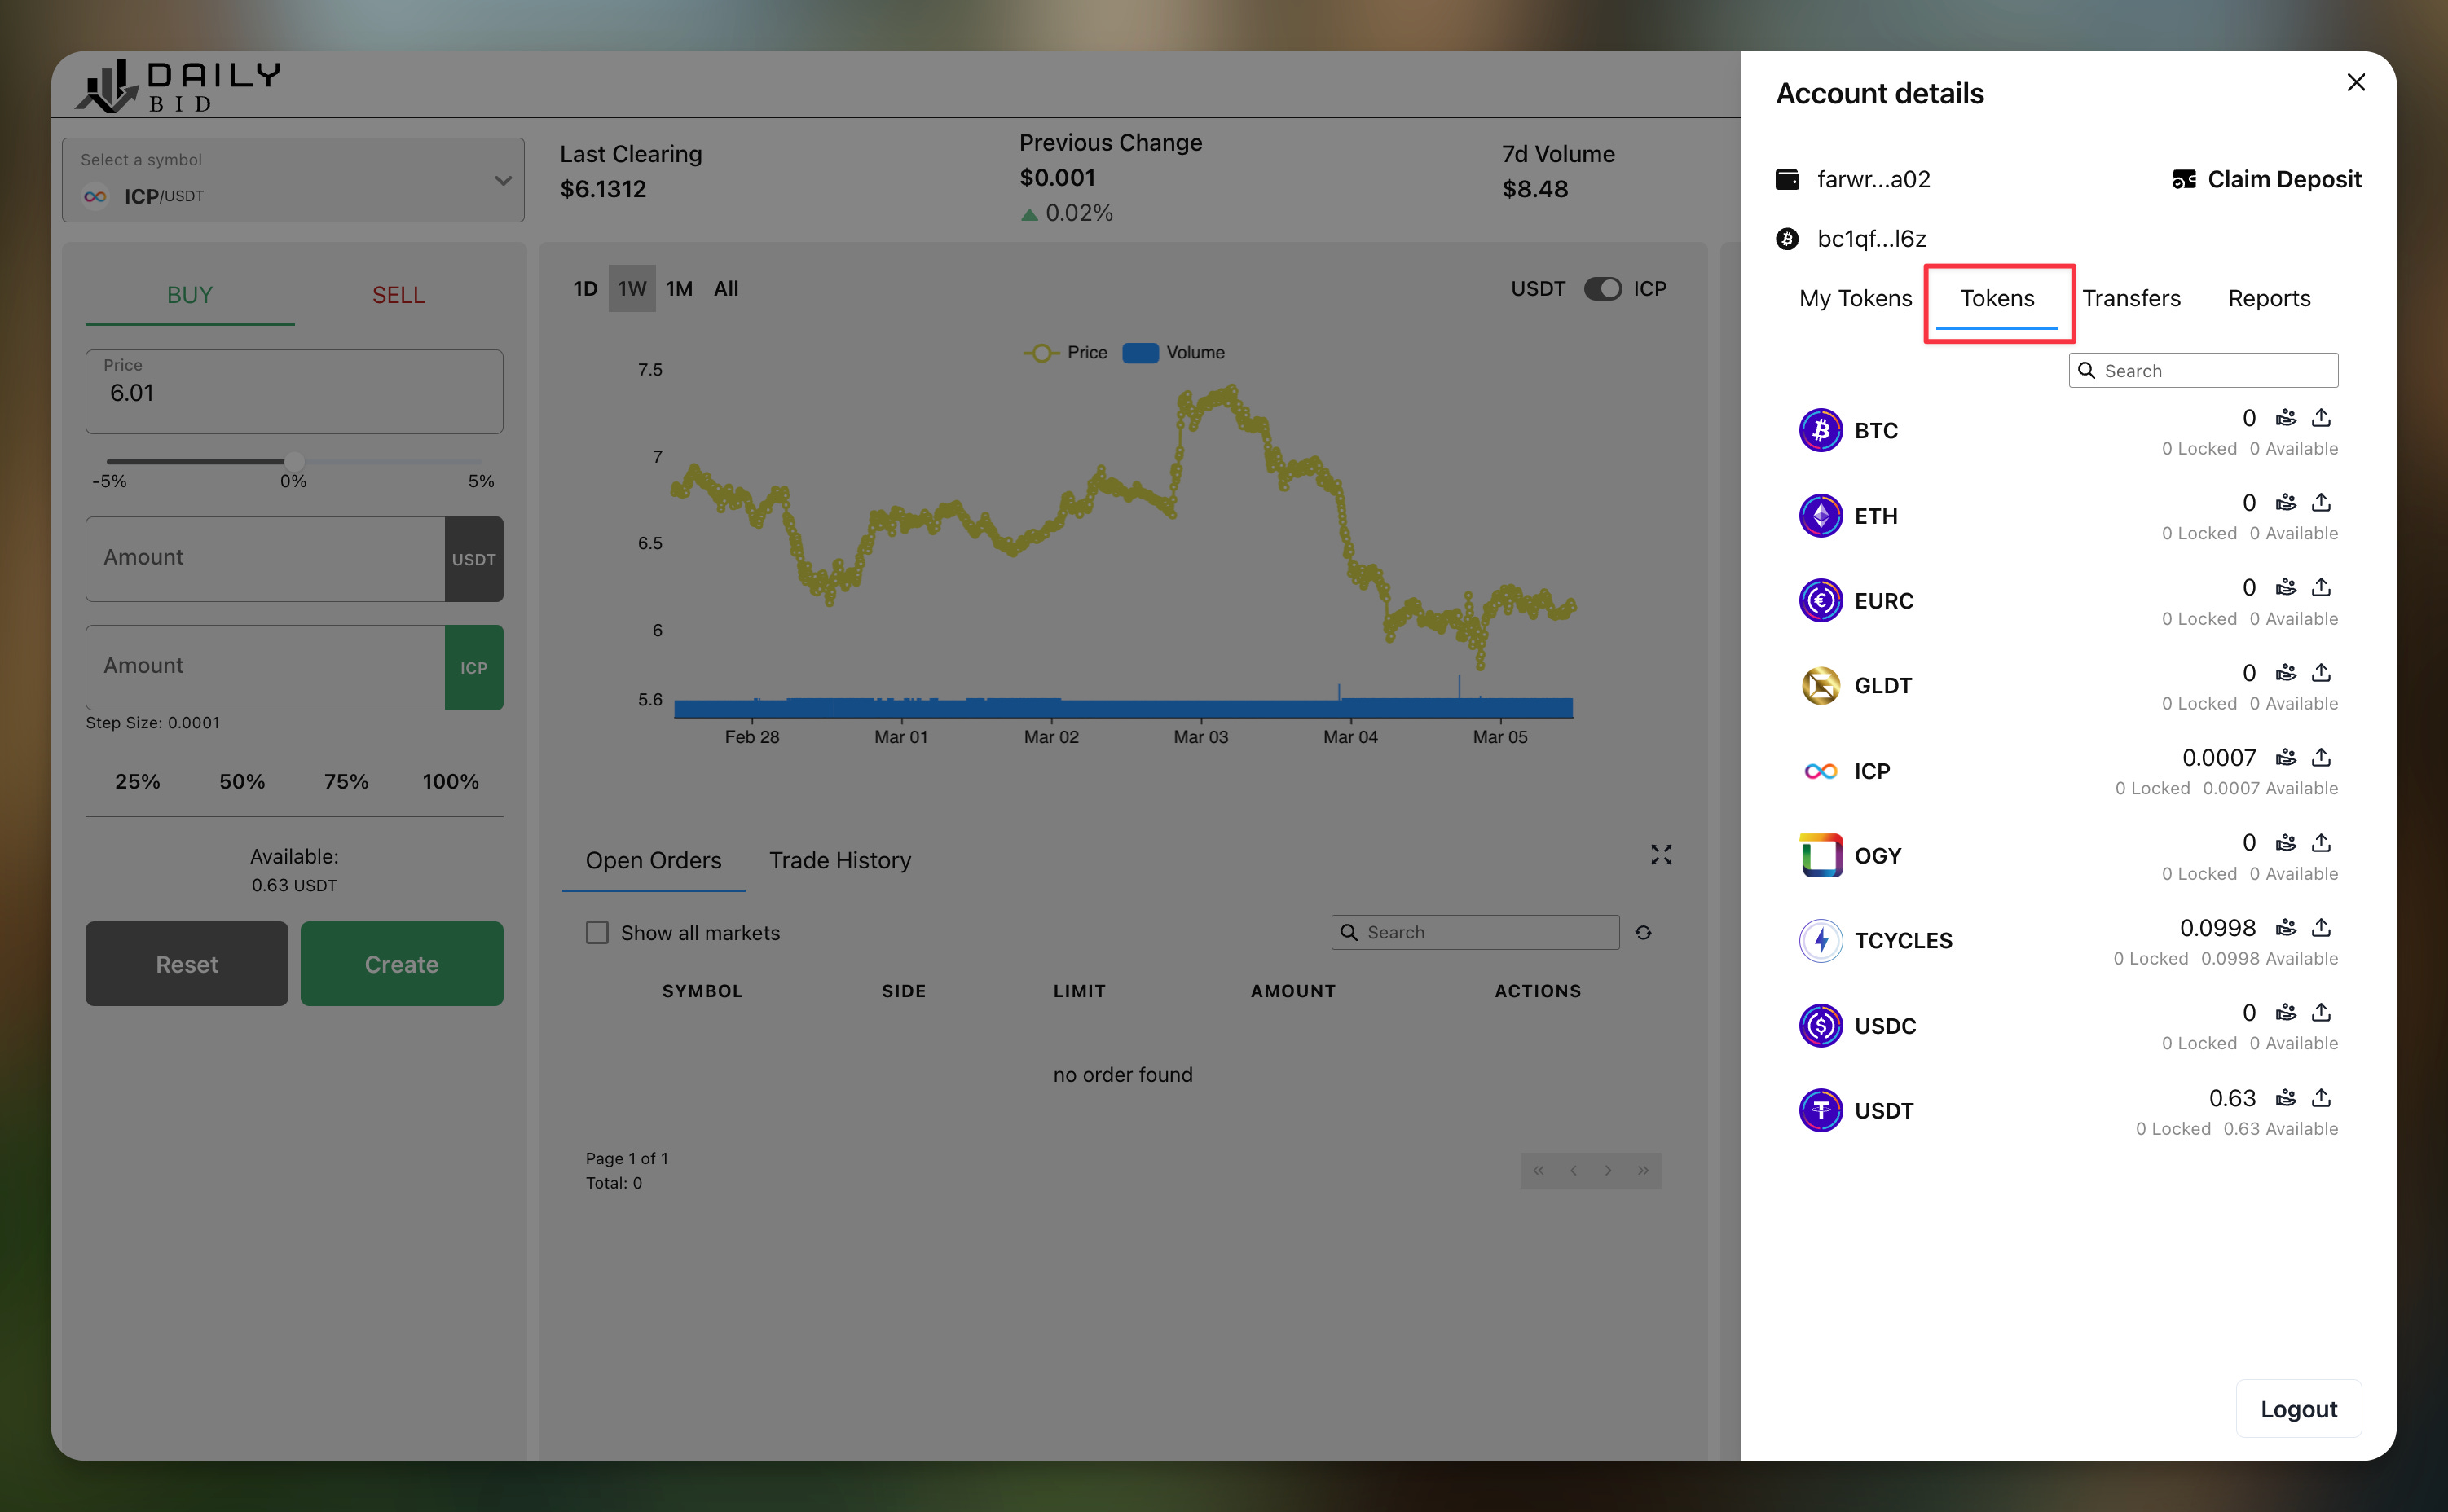
First see which tokens are supported by DailyBid. To this end, click on the wallet and select “Tokens” (not “My Tokens”). That will show you all tokens that can be deposited.
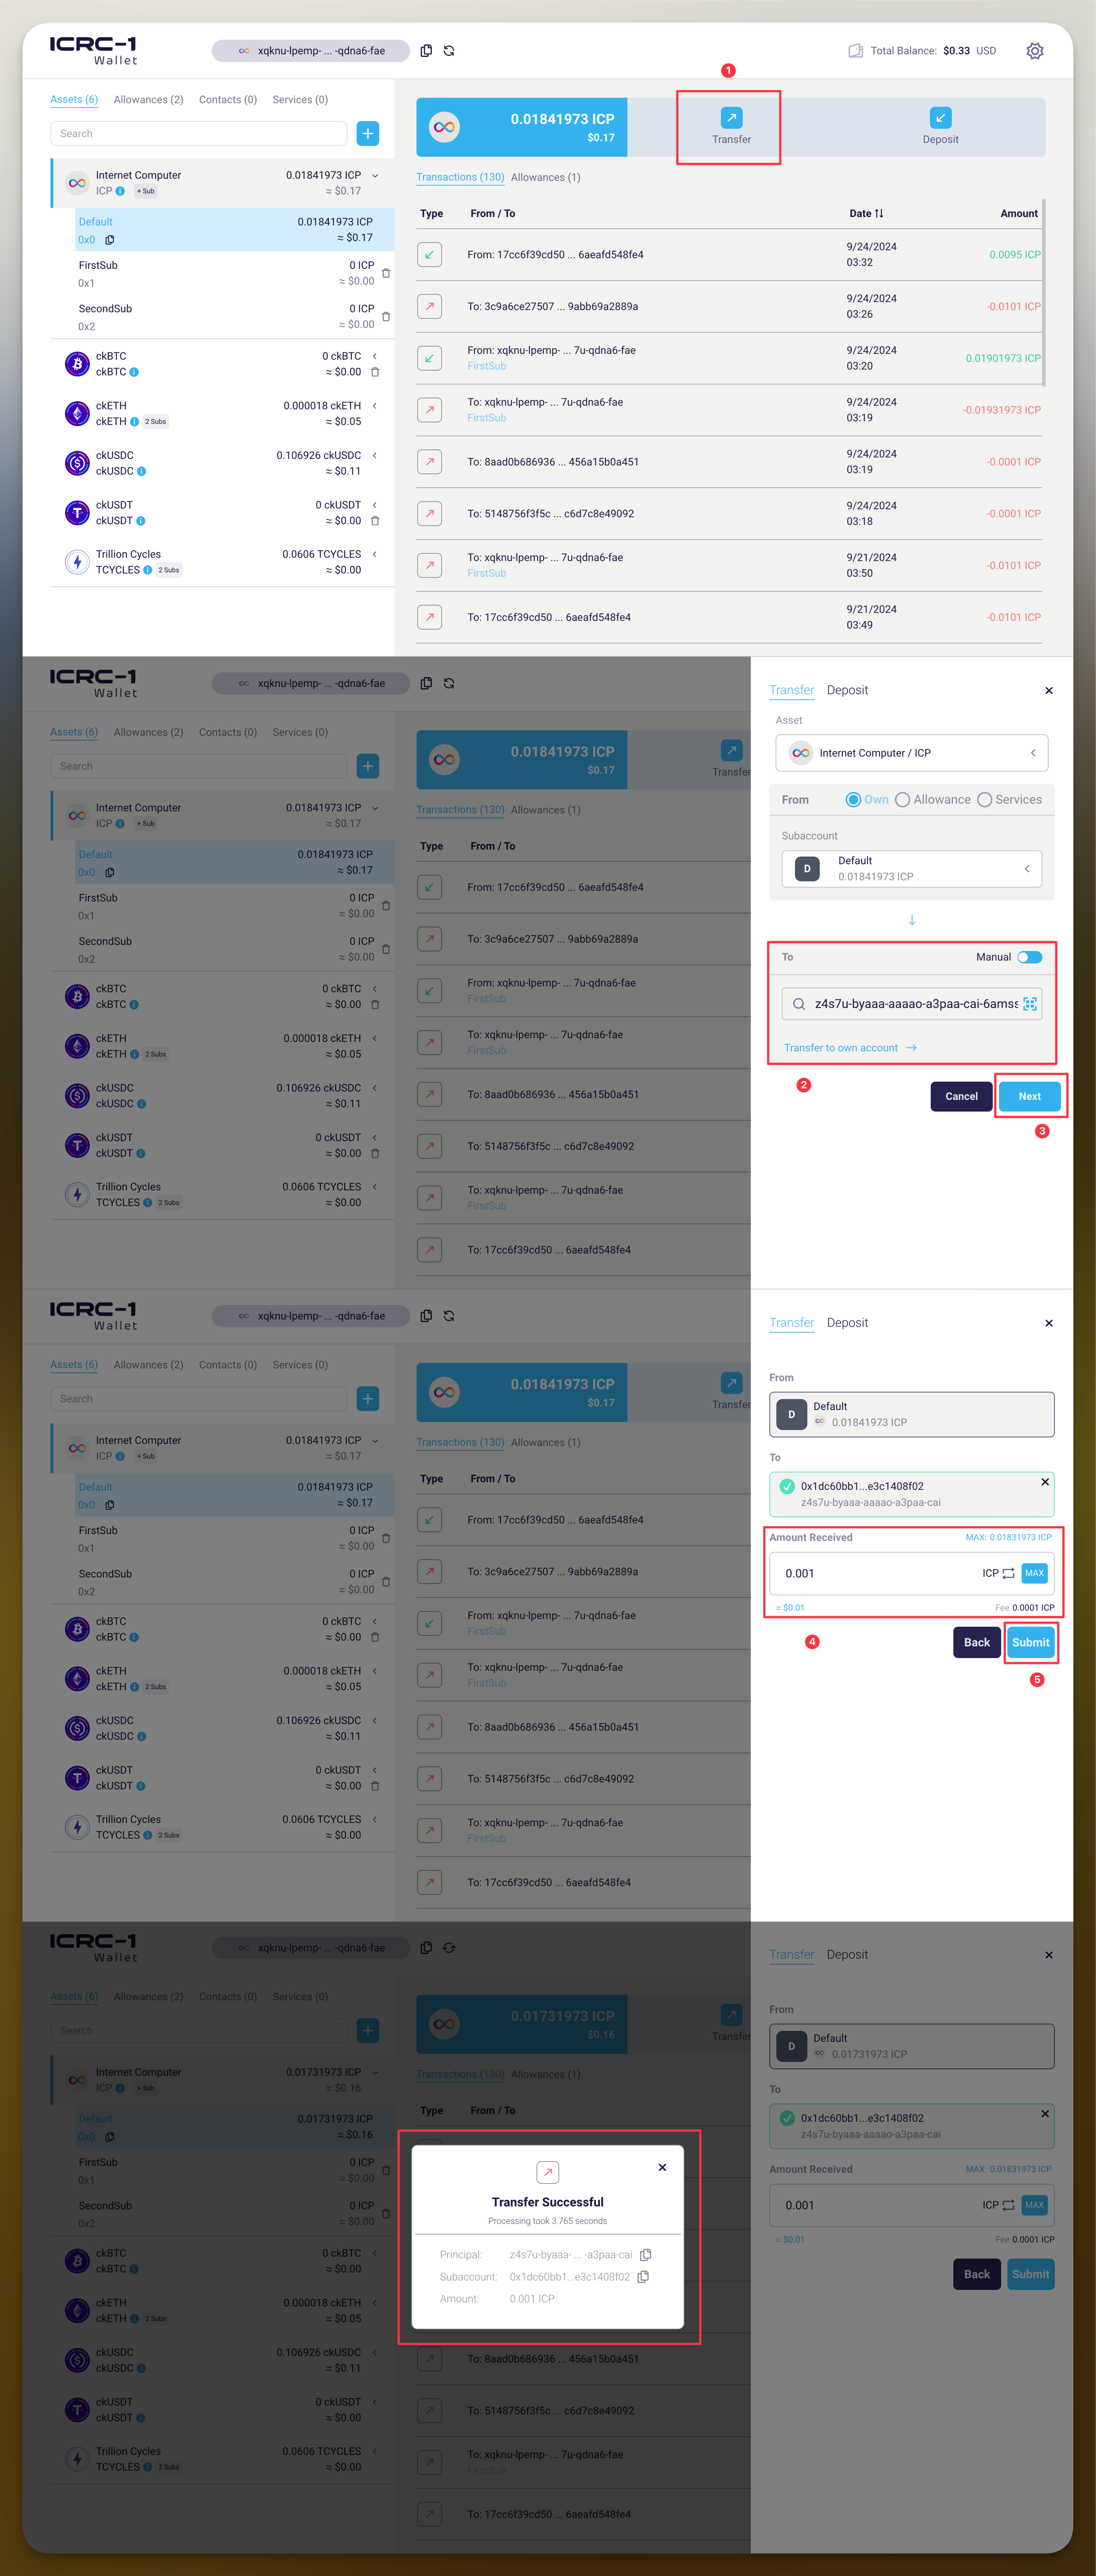
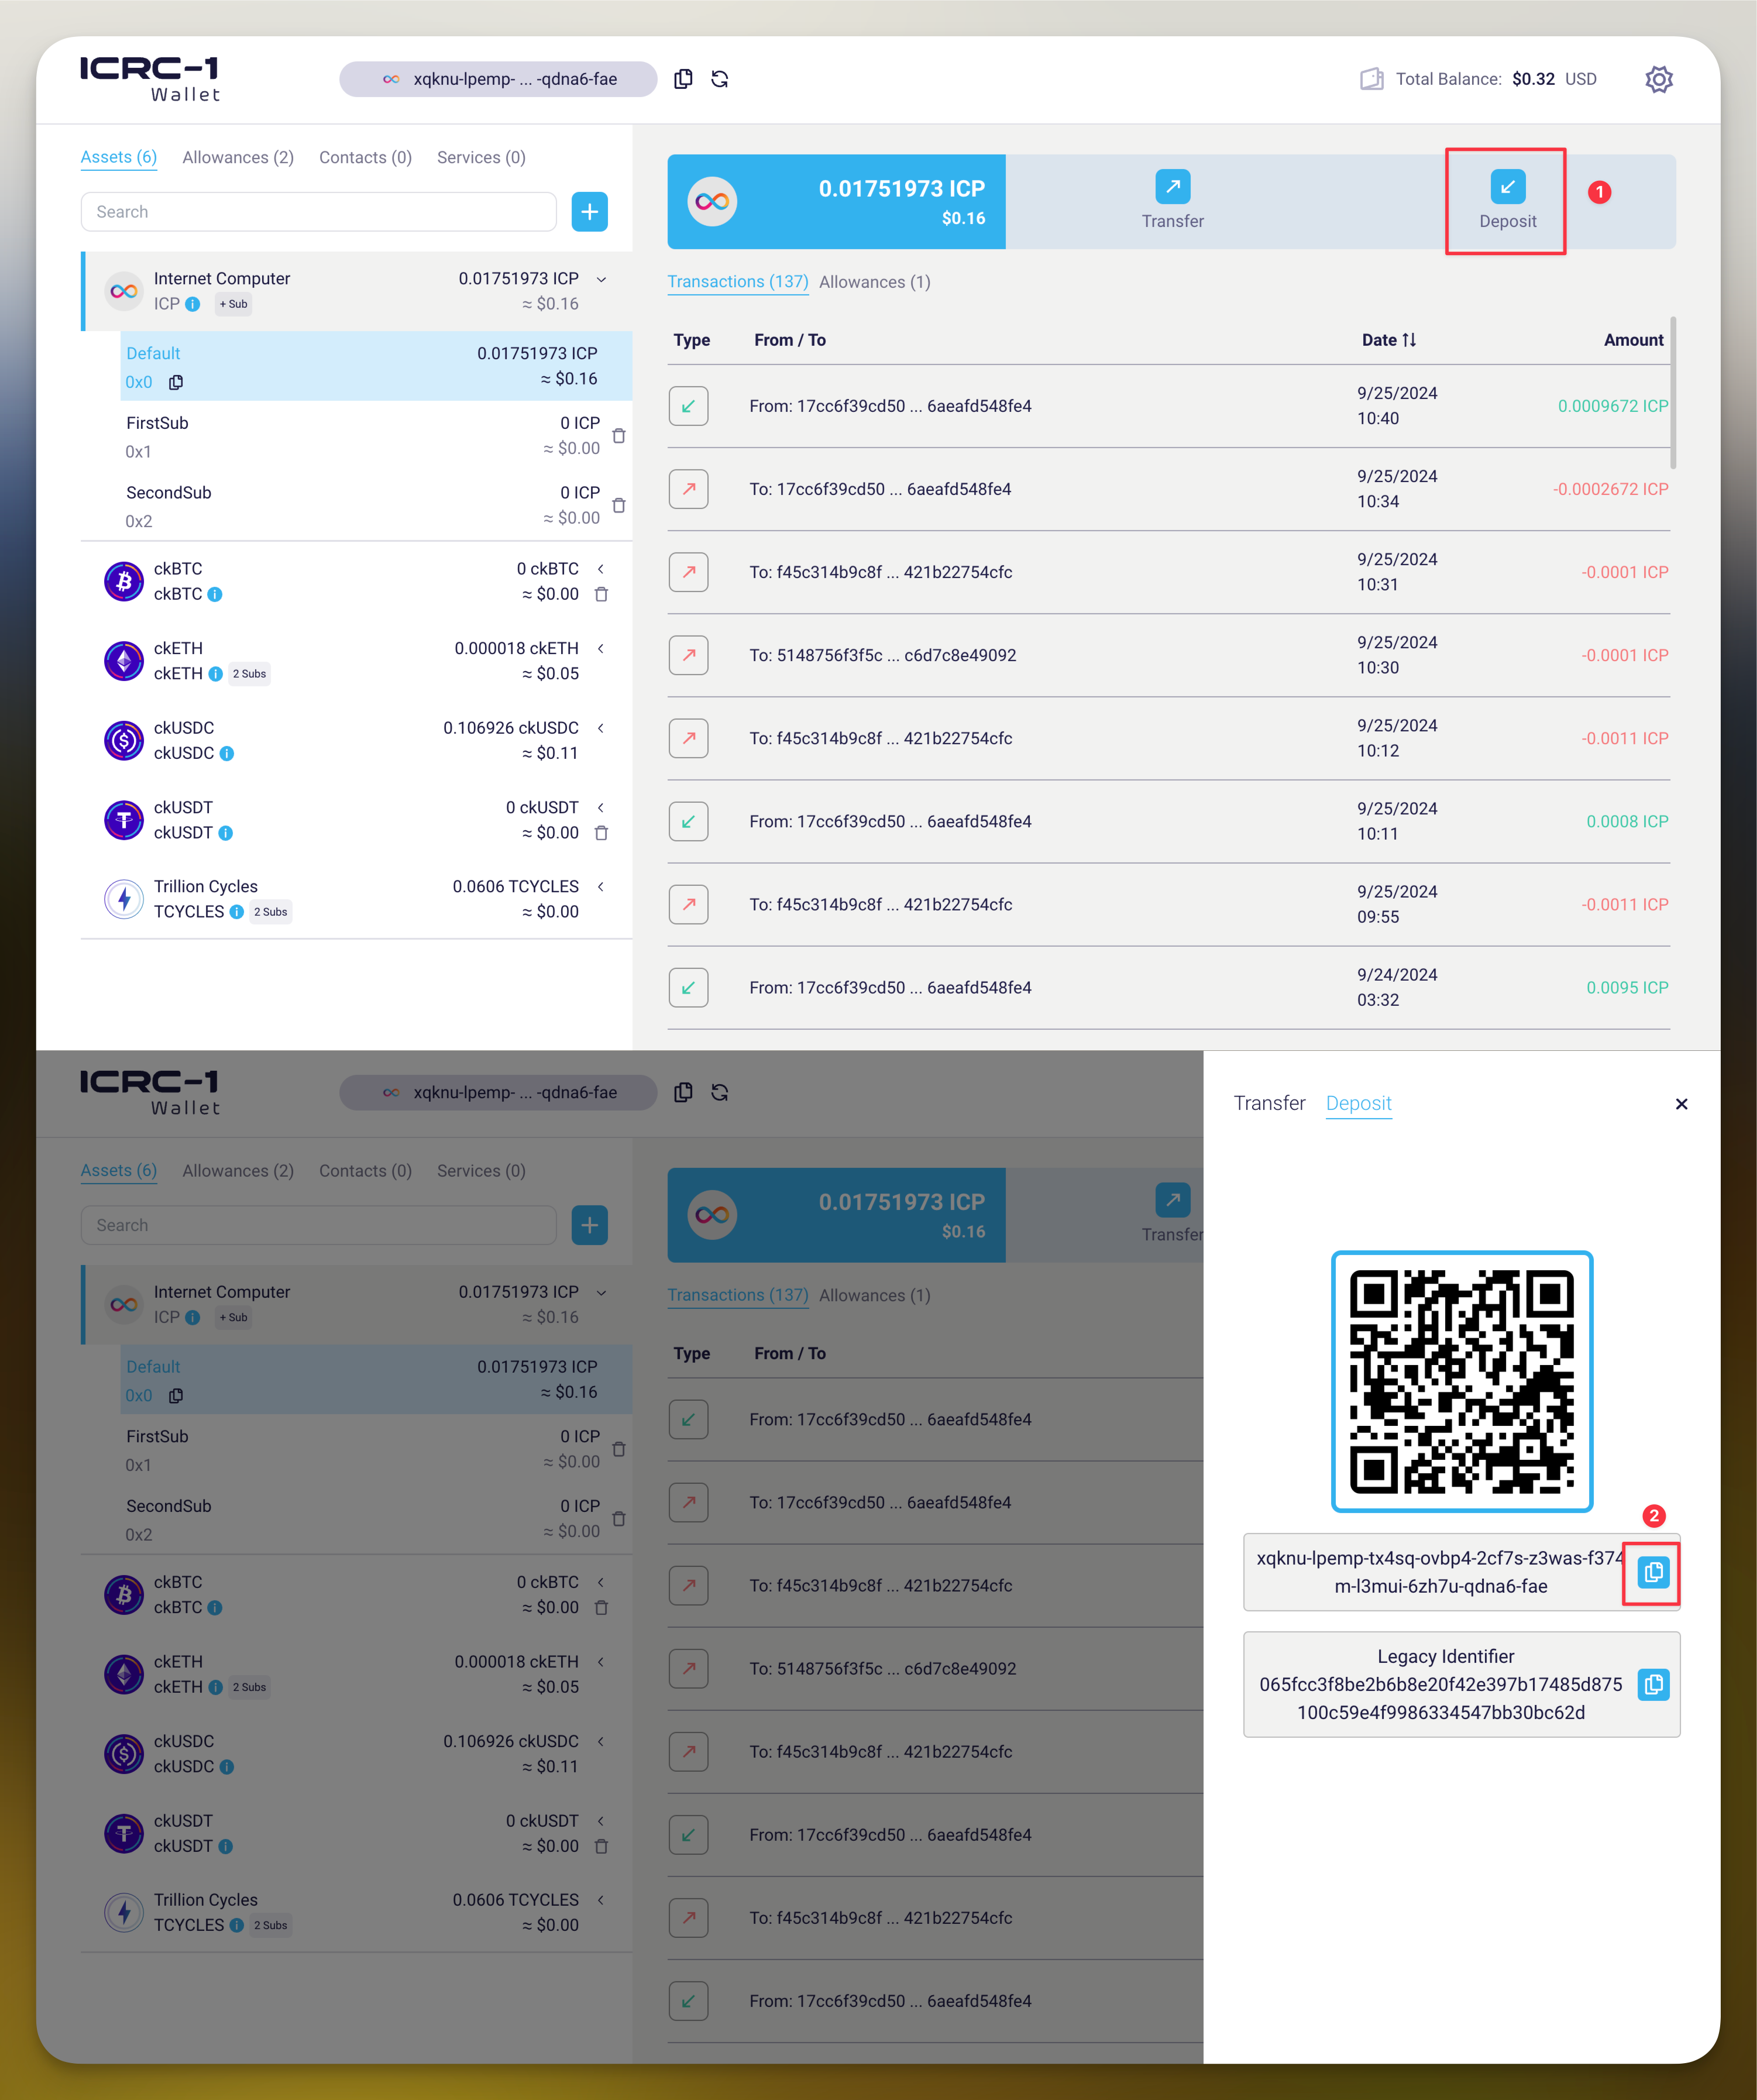
While still on DailyBid, copy the wallet account to your clipboard. Then switch to your ICRC-1 compatible wallet, initiate a transfer and paste the wallet account as destination. In the web wallet this works as follows. Note in the screenshots that we have indeed a different principal in the web wallet than we have in DailyBid.
Select a subaccount of the asset you want to transfer and click on "Transfer".
Paste the wallet address you copied from DailyBid into the “To” section.
Click "Next".
Enter the amount you wish to send.
Click "Submit". A success message will appear.
Claiming the Deposit from a Push Transfer
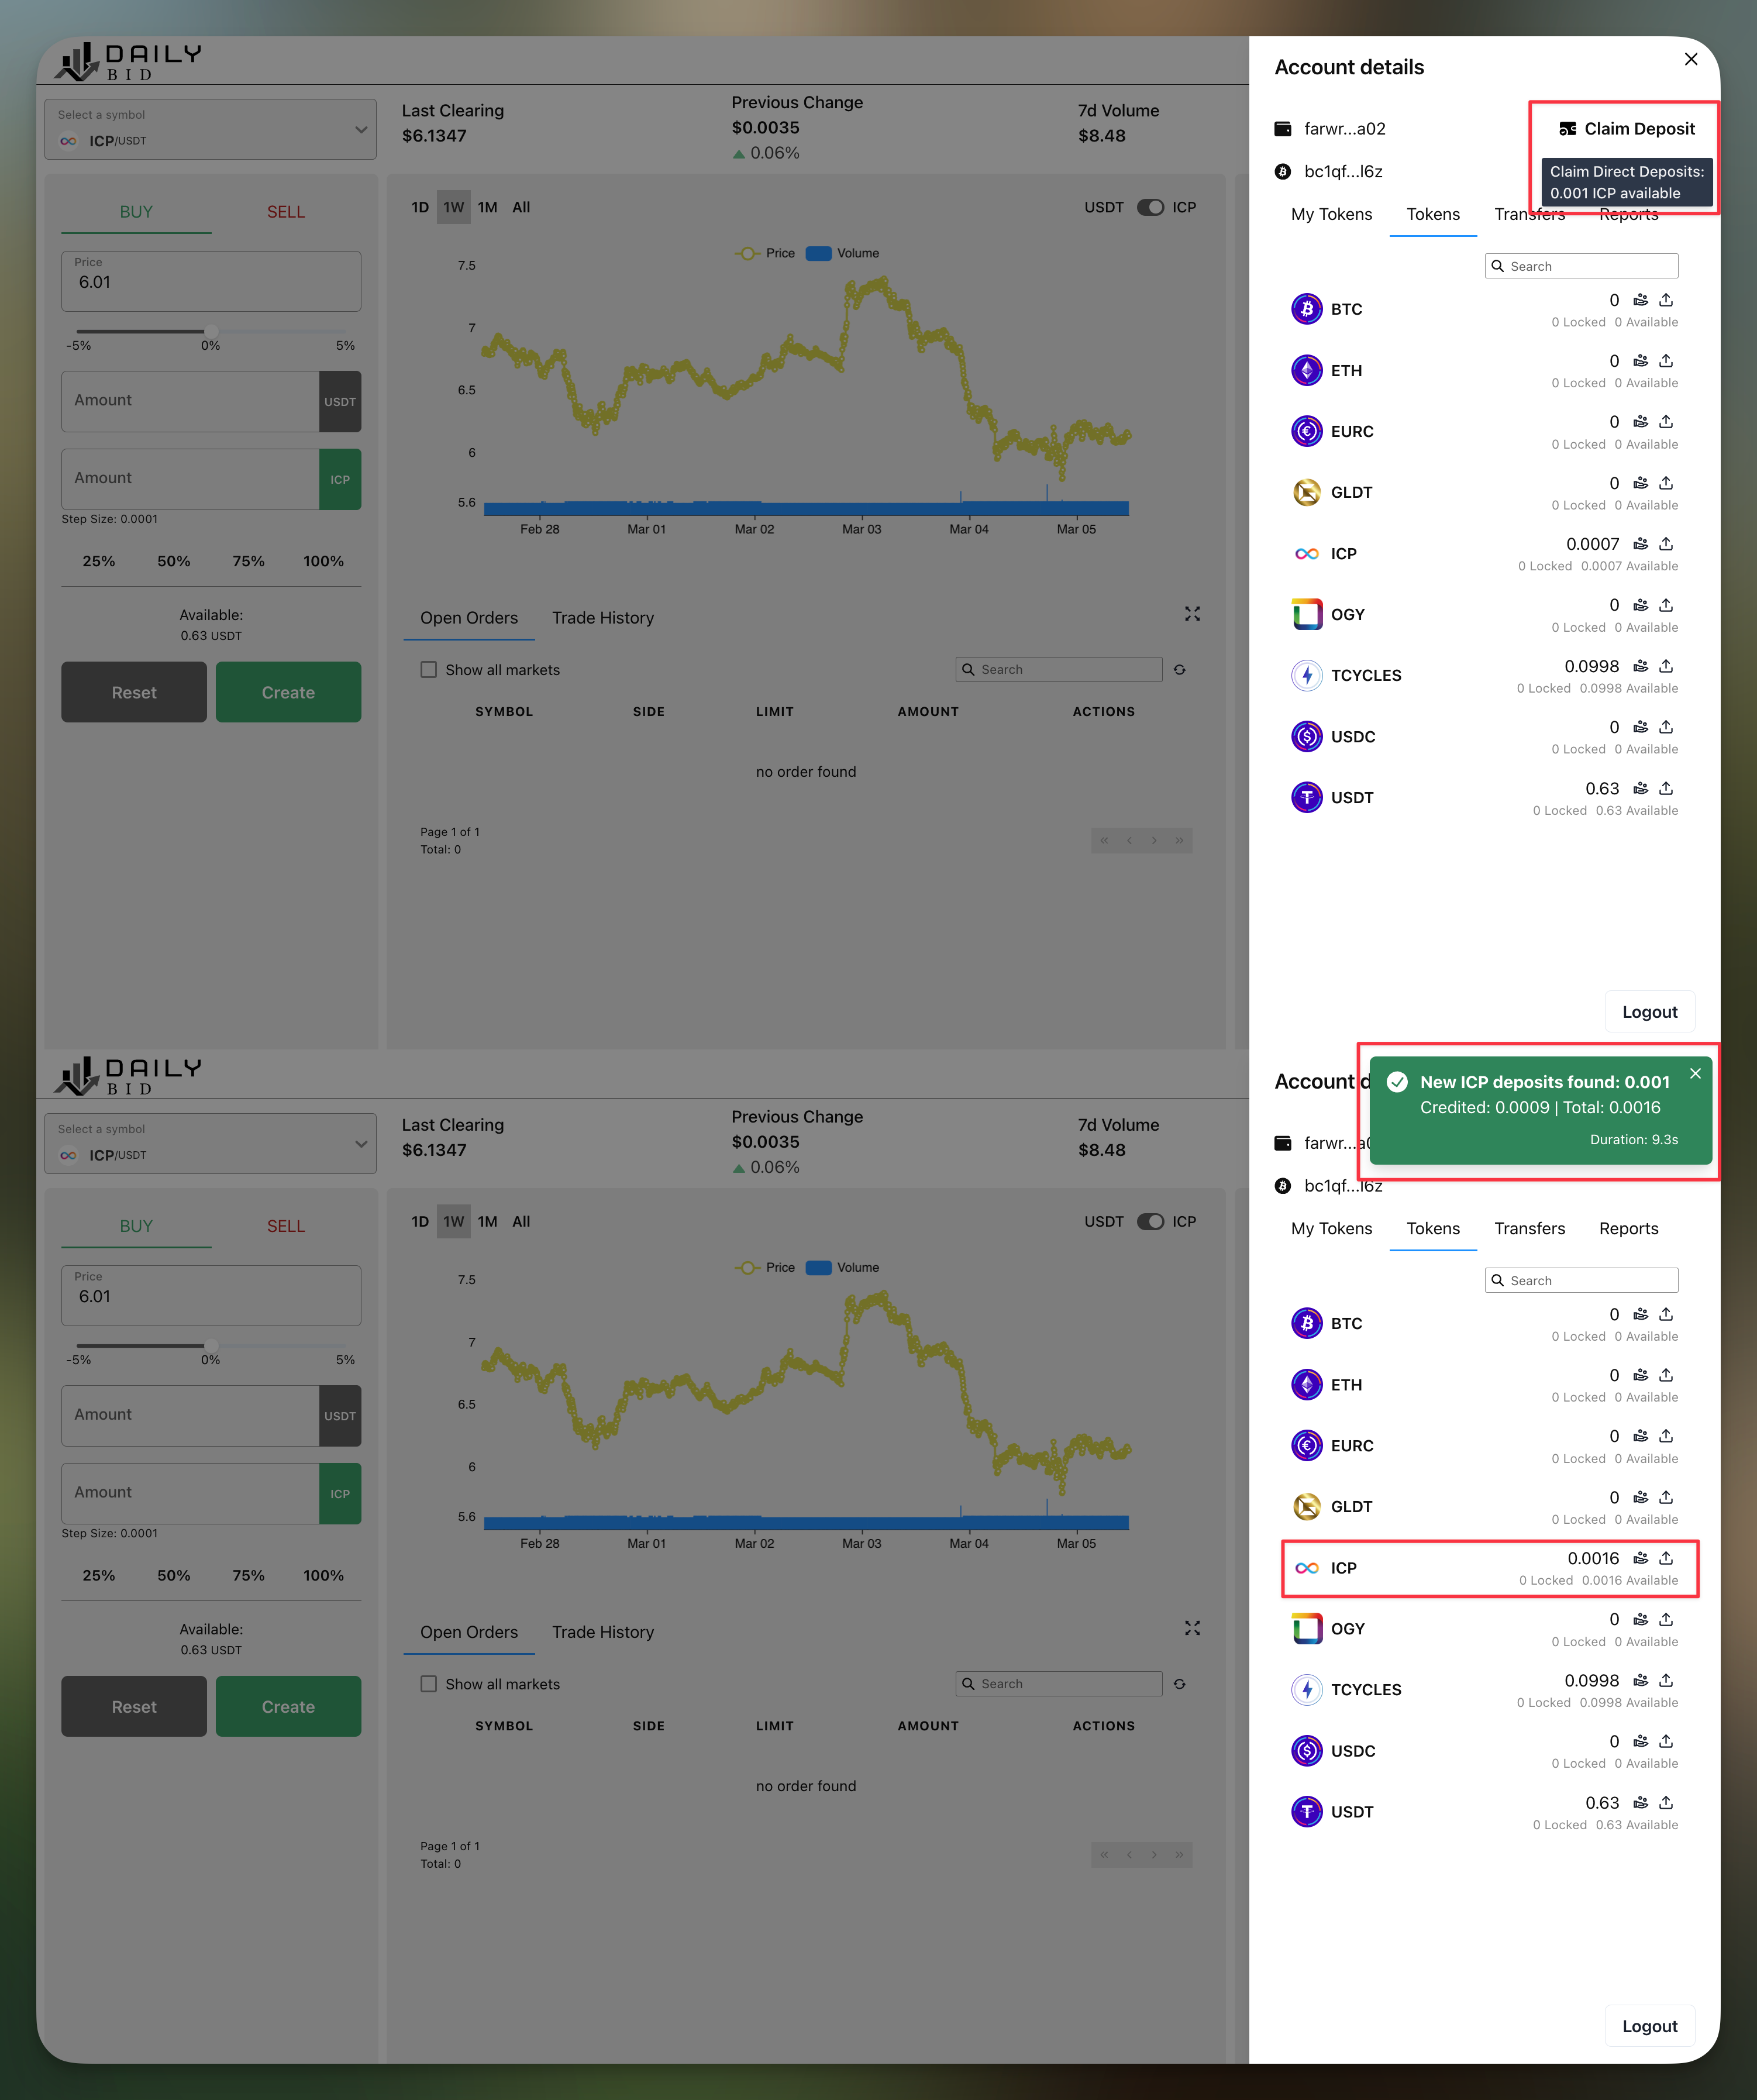
Back on DailyBid, open the wallet and select the “Tokens” tab. Actually, if you already had credits in the asset then “My Tokens” is also fine, you don’t need to switch to “Tokens” then. Hover over the “Claim deposit” button in the row of the asset. This triggers a check in the background of the deposit account and shows the result in a tooltip. In our example, we see that a deposit of 0.001 ICP has been detected. By clicking the button, you notify the auction backend, and it will credit the balance to your account after deducting a ledger fee.
Deposit via Allowance
Allowances are preferred by some users, especially if they want to make repeat deposits. (For further information on allowances, visit our Substack blog). Again, you start on DailyBid, copy your wallet account to the clipboard, and then switch to your token wallet. You will need a wallet that supports setting up allowances with the full range of ICRC-1 accounts as spenders (not only principals as spenders).
Currently, the only wallet we are aware of (besides using the command line with dfx) is the ICRC-1 wallet. To try it out you can open this web wallet and transfer funds from somewhere else to it. The steps to set up the allowance are as follows.
Select the subaccount from where you want to deposit tokens (the “source account”) and click on the “Allowances” tab.
Click the blue “+” button.
Select Spender “New” and paste the wallet account from clipboard into the Spender field. Enter amount and click Submit.
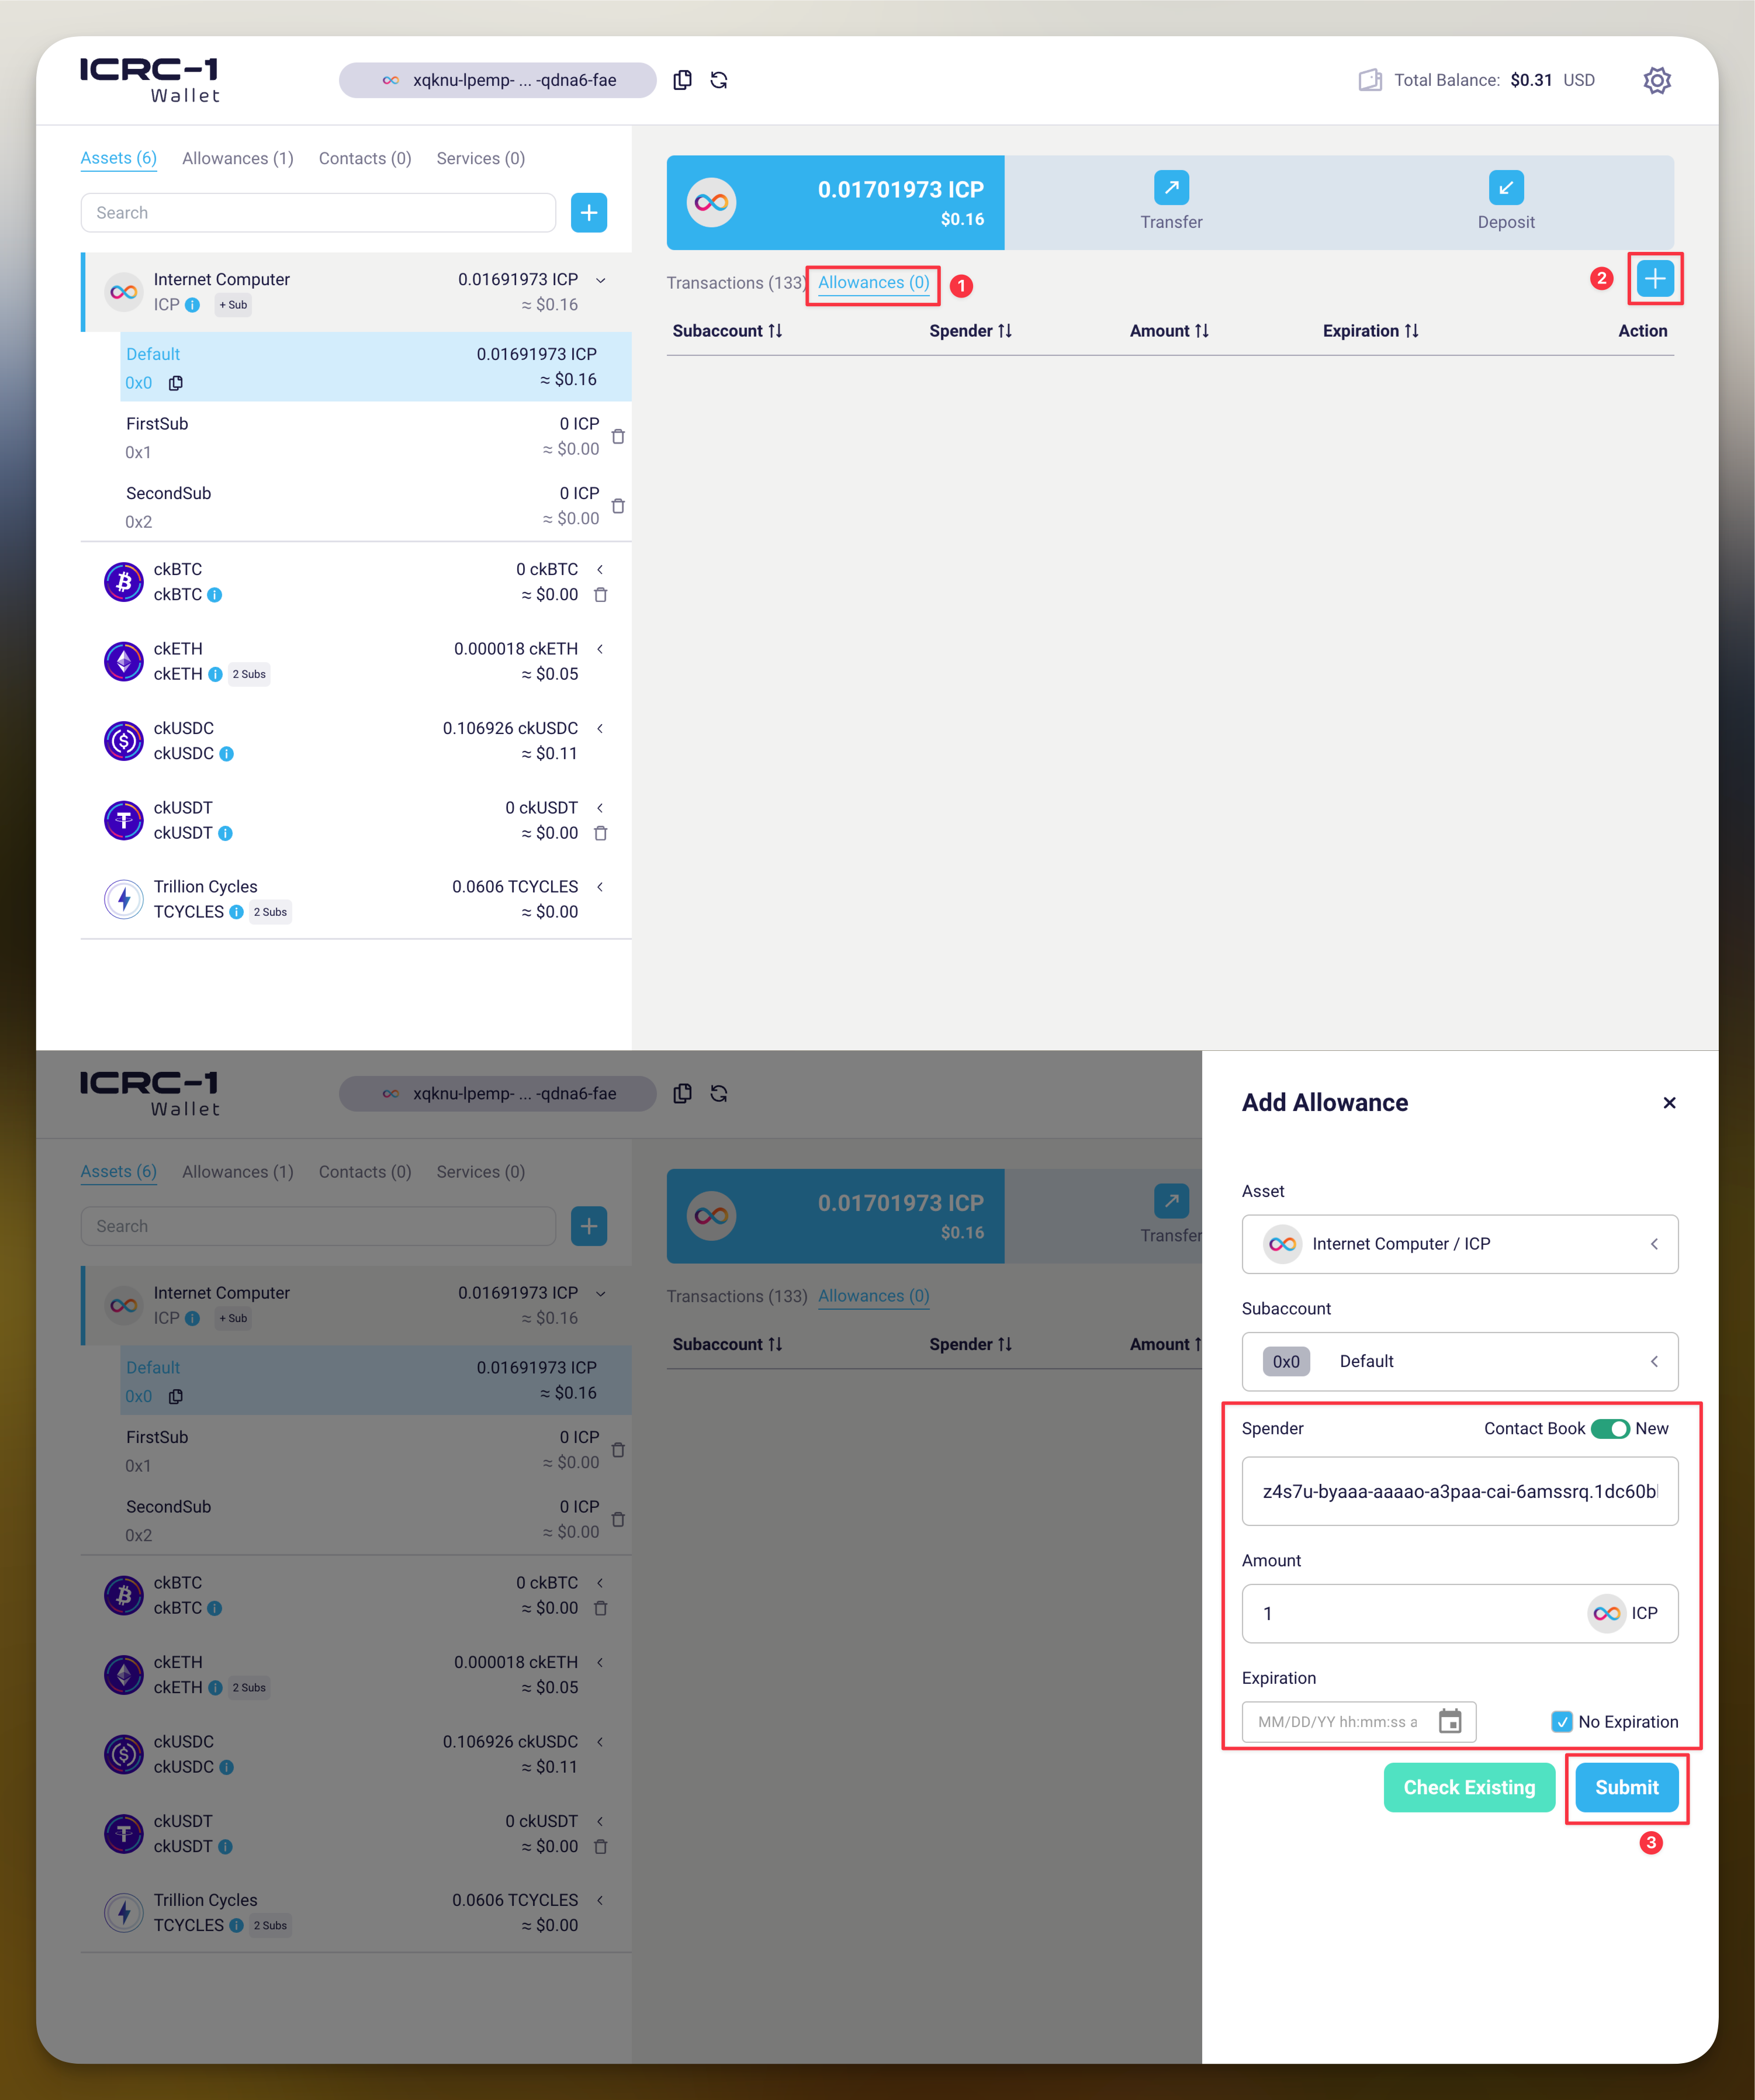
Before going back to DailyBid, copy the source account to your clipboard. To do that, with the subaccount that is the source account selected on the left, click on the “Deposit” button. This opens a window from which you can copy the source account as an ICRC-1 account to your clipboard.
Alternatively, if your source account is the default account of any asset then you can also just copy the user principal from the very top row of the entire screen.
Claiming Deposits via Allowances
Back on DailyBid, in the wallet’s “Tokens” tab (1), click the "Deposit by Allowance" button of the respective token (2). Two fields open up above the “Deposit” button (3). Here, you paste the source account from clipboard and enter the amount to deposit. This is the amount of credit that you wish to receive. The amount drawn from the allowance will be higher due to the ledger fee. Once you confirm, the deposit will be processed.
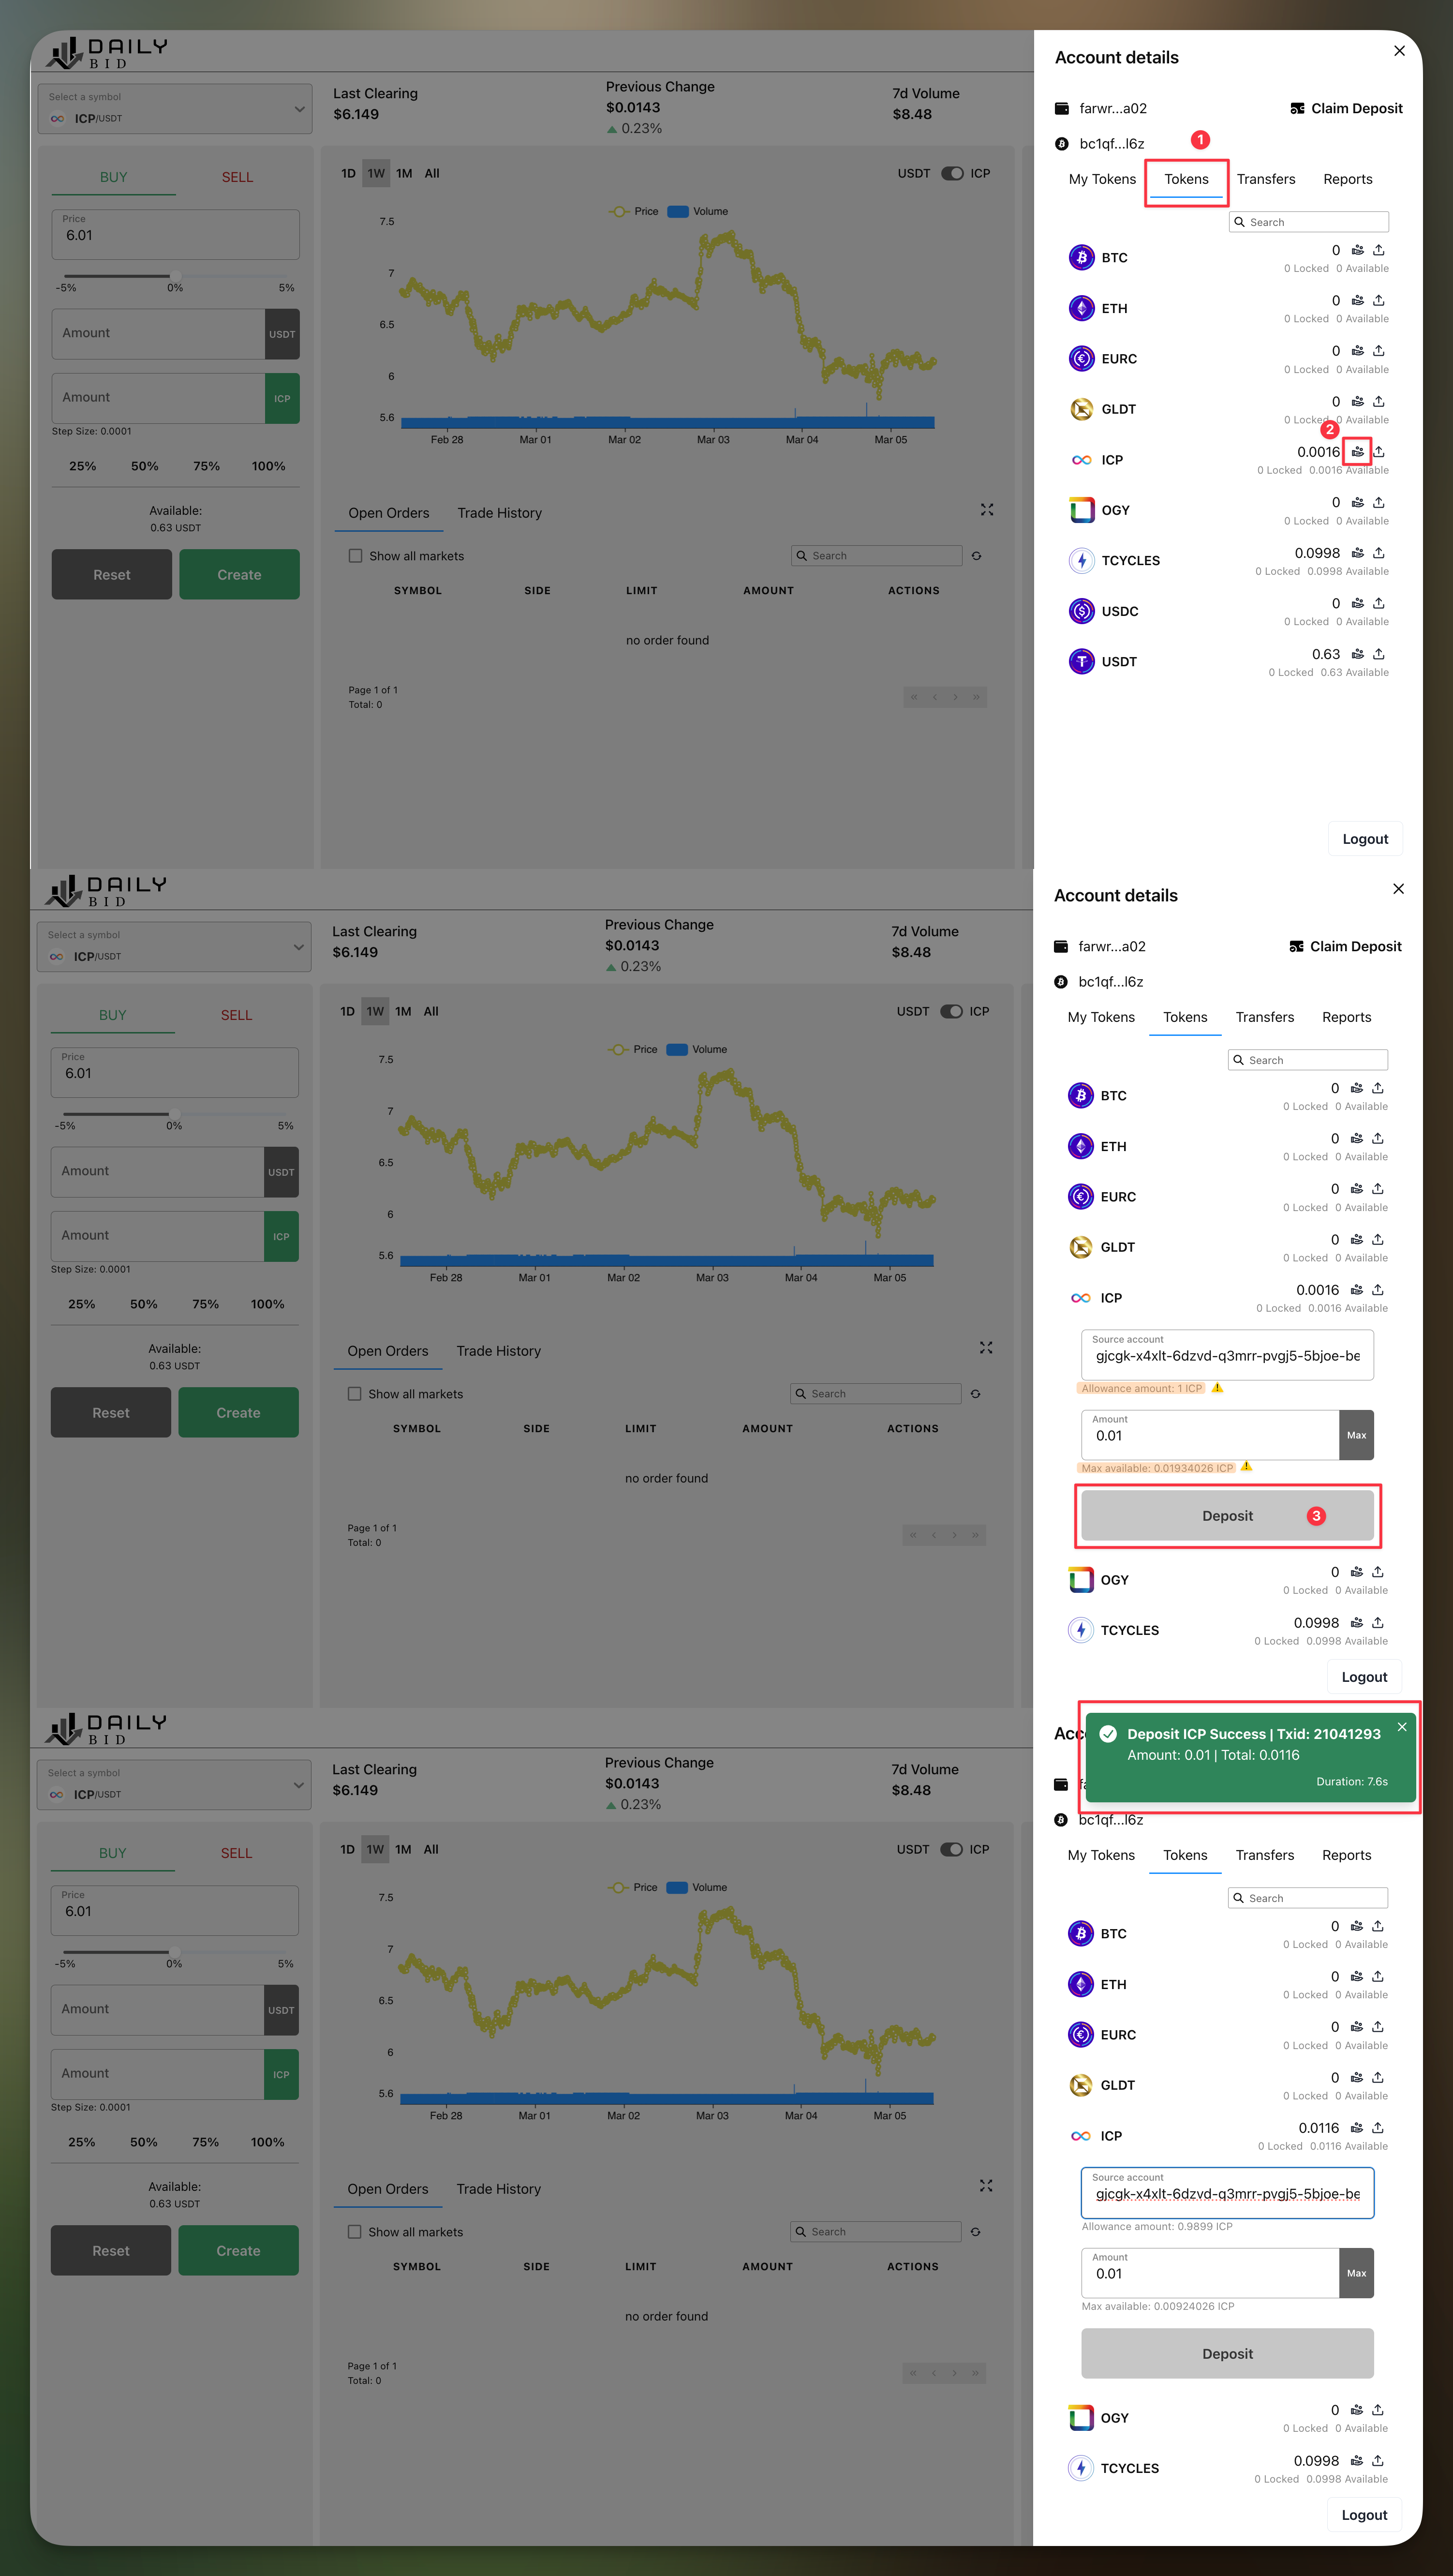
Below the source account field you can see the current allowance amount. Below the amount field you can see the maximum available credit you can receive. The latter is calculated as the smaller of the allowance amount and the available balance in the source account, minus the ledger fee. For convenience, a “Max” button is available.
Making a Withdrawal
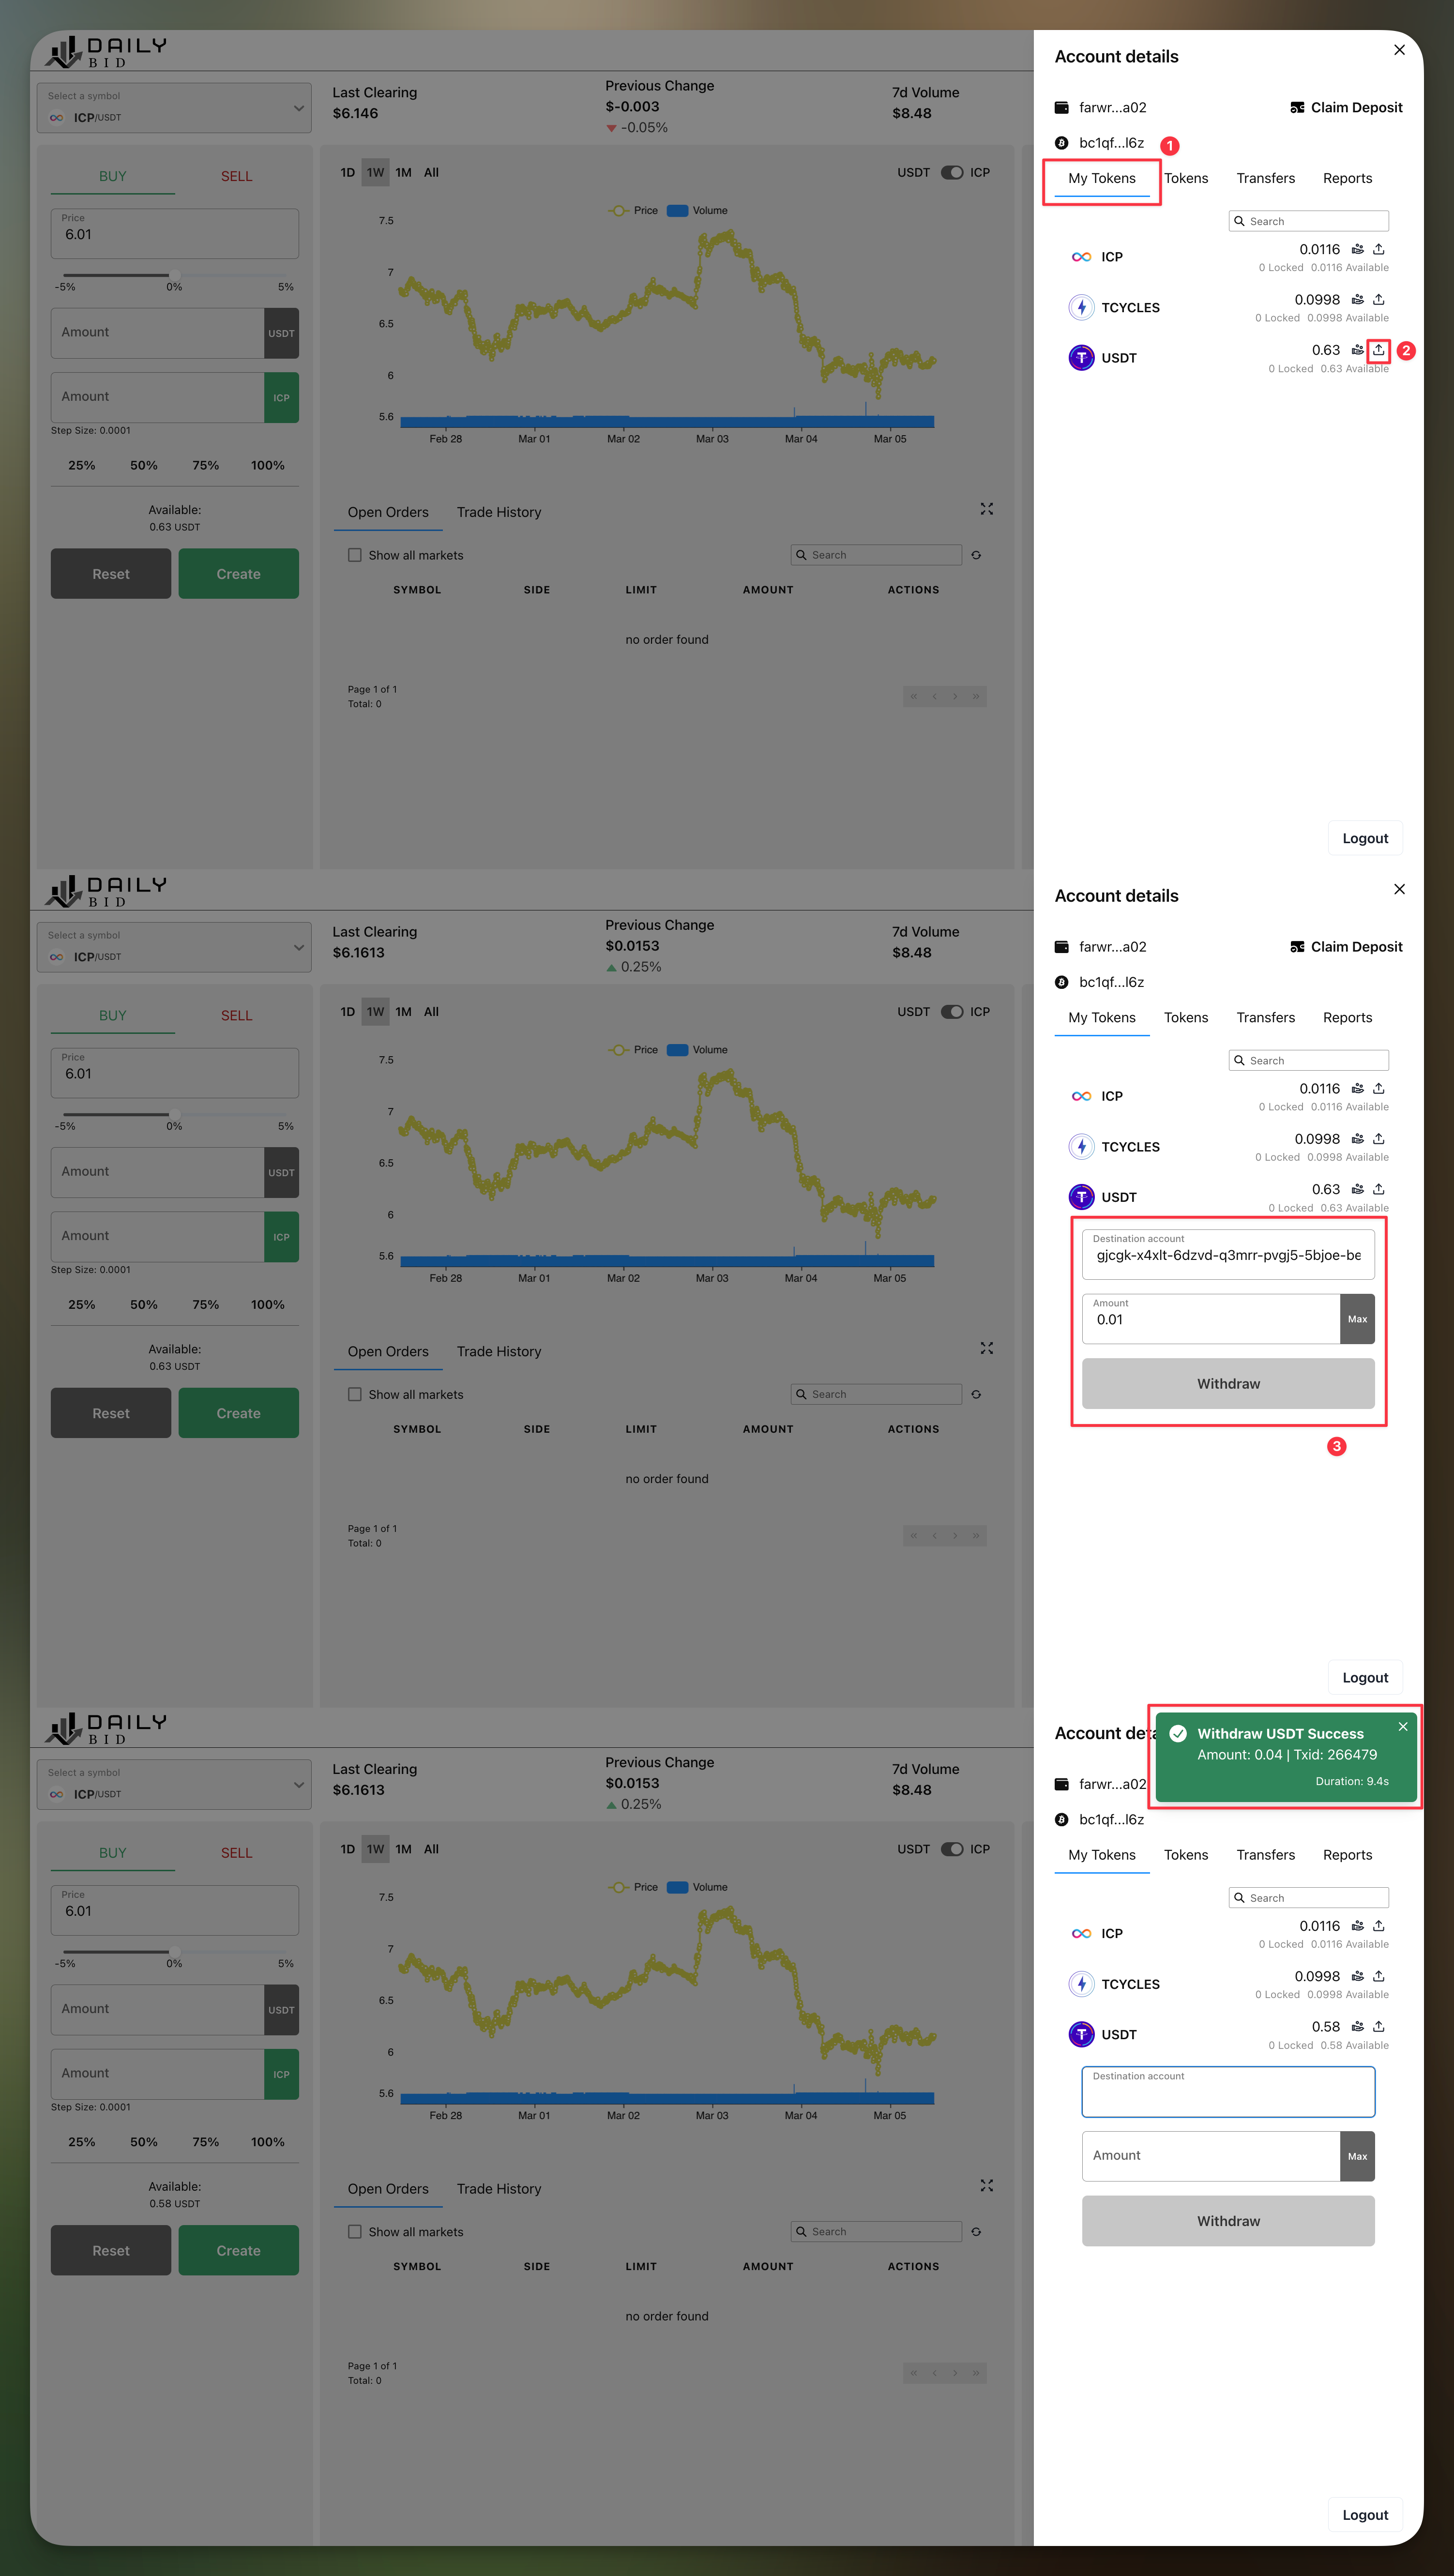
In addition to deposits, you can also make withdrawals from the auction backend. To do so, click on the "Withdraw" button next to the asset you want to withdraw and enter any ICRC-1 account as the destination. The amount field, for convenience, has a “Max” button to withdraw the entire balance.
Technical Notes
Behind this streamlined process is a new standard called ICRC-84 which is designed specifically for making ICRC-1 deposits to DeFi and other service canisters.
The push transfer and allowance methods for making deposits each have their own advantages and disadvantages.
Allowances can be safer against accidentally pasting the wrong account in your wallet. If you set up an allowance, configure the wrong spender and then try to deposit from it then the deposit will simply fail. You can then correct the mistake by deleting the allowance and define a new one. If you make a push transfer to the wrong destination then the funds are gone. Hence allowances remove a possibility of error here. In practice, however, this problem is solved for push transfers by simply saving the deposit account in the wallet’s contact book.
Push transfers on the other hand are more flexible. They are expected to be supported by a wider range of wallets than allowances are. They can even be used to withdraw from one DeFi service and deposit directly into another DeFi service without using any intermediate wallet. You can do that on DailyBid right now. You can withdraw as user A and directly deposit into the deposit account of user B.
The two methods can also differ in the amount of ledger fees. Making a push transfer and claiming it costs two times the ledger fee. One fee for transferring into the deposit account and one fee for transferring out of the deposit account and into the DeFi service’s main account. Setting up an allowance and using it once also costs two times the ledger fee. One fee for setting up the allowance and one fee for drawing for it. Allowances become cheaper when they are re-used. You can save fees by setting up an allowance for a higher amount and then making multiple deposits from it. In this way N deposits will cost N+1 ledger fees in total. Push transfers become cheaper when multiple pushes are made, for example from different sources, and then all are claimed in one go. In this way N push transfers will N+1 ledger fees in total.
Conclusion
By following these steps, you can easily manage your deposits and withdrawals on the DailyBid exchange using ICRC-1 accounts and allowances. Whether you’re making push transfers, using allowances or withdrawing, the interface provides a secure and streamlined process for getting your digital assets in and out of DailyBid.
Last updated: 11 March 2025